We use cookies to personalize content, interact with our analytics companies, advertising networks and cooperatives, and demographic companies, provide social media features, and to analyze our traffic. Our social media, advertising and analytics partners may combine it with other information that you’ve provided to them or that they’ve collected from your use of their services. Learn more.
Hello All! I’m in the process of starting my first 3d project and am noticing the very long carve times for this project. I want to share it with yall and see if I’m doing this right. I’m going to test cut this with some spare pine. 2 2x8’s joined together. Project Sign will be 14x26. Are the long carve times because of the size of the sign or are my cut settings incorrect?
Here’s my sign project without the text
Roughing Pass Settings: Cut time 4 hours 29 minutes
Your settings look good, the 14 hours for a finish pass is terrible.
It looks like the only 3D portion is the top section, are you telling Vcarve to only perform the rough and detail on that portion? Then just do a pocket operation on the bottom. If you are not doing that already, it should cut your times in half.
Thanks Phil and Allen, Phil, I’ll try those settings when I get home from work later. How much time do you think it should take to carve that sign? I just wanna make sure I’m in the ballpark. Thanks!
Did you mean 100ipm with the 1/4 or the 1/8? And 150 with the 1/8 end mill?
What do you mean by the $112 set to 1800? Is that in the Gcode?
Hi @DouglasStevens, a couple of things I have found when working with Aspire and 3d Models. The only time I use selected vectors is when I am doing rest machining and coming in with a smaller bit for detail. Depending on the project I use either material or model and it looks like you are cutting the whole model anyways. Also, for the finishing pass at least, I always use rastor, I find it works much better with less headaches and heartaches. Most of the tutorials I have seen say to go that way.
I am sure others will chime in with their opinions but these are things that work for me.
Thank you Keith and again to Phil. Having you wonderful people in this forum to help me along the way have been immeasurable! I’ve changed my settings as you guys have stated and have shortened my carve times.
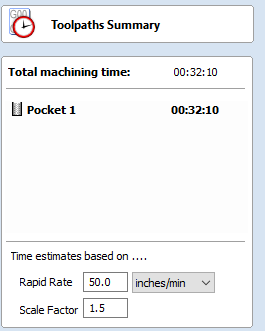
I was always hovering over the Toolpath with the mouse to get the time. I never realized there was a Summary of All Toolpaths button. I feel like a moron. lol Anyways, you were right. My Scale Factor was set at 2.0. I set it to 1.5 and came up with this.
I tried that originally but then switched to Model Boundary for the rough and finish as per Keith’s suggestion. When I switched to Model Boundery the preview shows that it’s just cutting the project model and not the rest of the board.
The entire model is being considered 3D. Unless you ‘really’ need the bevels on the inside of the pockets and the outside of the piece (why not just use a hand or table-router for outside bevels?), then a good option to consider for reducing the time is using a selected vector to only carve the pocket with the 3D Finish toolpath.
When you have the 3D View open, and hover over the area where the bottom part of the pocket is, where you’d place your text, it will show you the Z dimension in the status bar at the bottom of the window.
Ok so now I’ve got the roughing pass cut and it looks pretty good. I’m having a problem with my finishing pass. The 1/8 ball nose bit is cutting over an inch into the edge and breaking bits. Luckily I stopped the project before too much damage occurred. I’ve broken two bits thus far until I figured out why. It’s trying to cut the edge of the model where it is .125 deep. I don’t think the roughing pass took out enough material. There is no pass depth setting on the 3d finish pass so I think it’s trying to cut through it all at once? I hope I’m making sense as I’m pretty confused as to what’s going on.
24" x 4.2" @ 0.2357" deep, 40% stepover, 2 passes @ 100ipm. It’s ONLY the vector at the bottom, and it’s a standard Pocket Toolpath, not a 3d Roughing pass. If you can spot what’s throwing the times off, let me know.
I don’t think you’re using the vectors I created based on the cut preview. Are you using the CRV file I sent back to you? These toolmarks shouldn’t be on the outside for the roughing operation… this means you didn’t use the vector on the inside of the top pocket I made…
The vector you want to have selected while you generate the rouging 3d and finish 3d is on the inside of the top pocket. It’s a dashed magenta line.