Multi bits

Hi JordanLee,

Thanks! Your description is pretty much what I assumed, but for neither love nor money, I cannot get "clear a pocket, to well… clear a pocket.

my original questions stand;

  1. what is the difference between the four above listed cut settings, and the four cut settings that pop up when I first attempt to bring in a design (I must choose one before proceeding)? While they seem similar, their titles are different, so I assume them to be different?

  2. what combination of cut settings (one chosen when importing the image, and the other from the cut drop-down) do I need to use to get it to clear the pocket?

  3. How do I instruct the software to clear a pocket, keep the outer edge, and cut the entirety of the project (through-cut)?

As an FYI, I have made several attempts at work-arounds. I found a different ‘heart’ pattern in the available choices which was solid. This will allow me to clear the pocket, but the problem is that I cannot figure out how to have a ‘rim’ around the outside, so that I can cut it out (let alone cut it out leaving a rim.

I attempted to do what Seth did in his video, which is to say simply add more copies of the design and make them different sizes. This seemed logical to me, but it does not work. When doing so, the spacing between the different ‘versions’ of the heart does not remain consistent between the enlarged one vs. the smaller one (the space at the two top arcs gets too wide while the space at the bottom point gets too narrow, and no amount of moving and manipulating will change that. And as this is not an art program, there is no way - that I have found - to customize the shape to make it parallel to the lines of the original.

You had mentioned sharing my project. Please accept my apologies, but I have no idea how to do so. If you can tell me how, I will share with the group so that you can see just how simple this project is - in theory - and yet how complicated it is in practice using my limited knowledge.

As an aside, a couple of months back I told a technical rep that Inventables needs to consider setting up subscription classes to teach people like me how to use the software. I was told that the goal was to make the software so intuitive that no one would need classes. My reply was; “that is a noble goal. But much like working toward world peace, it is simply unattainable, so classes would be very helpful. Bicycles are intuitive. Please show me the person who hopped on one and rode it without assistance and instruction.”
I believe the fact that conversations like this exist on this forum is proof that some of us need education if we are ever going to be able to use this equipment with any level of proficiency (I hope that someone from Inventables actually reads these).

Thank you Seth!!

valuable information, I will give that a try this afternoon. That however will create a new problem. I am trying to do something very similar to your bulldog tray. I wand a ‘lip’ or ‘rim’ around the outside. As such, I suspect that deleting one of the hearts will just make the problem worse. I just replied to JordonLee and described the additional problem that when I try to do as you did, which is to say bring in additional copies of the heart to make the different features (carved out center, with a rim), it will not keep the lines parallel between the outside and inside hearts.

I’d happily share the project so you can see what I mean, but I am completely ignorant as to how to do so.

Thank you again for your patience, i know that newbies like me and our stupid questions can be frustrating for those of you with a much flatter learning curve. So know that I appreciate any and all help.

all my best,

Joe

All,

I just got off of the phone with Tec Support at Inventables. Found the solution (we believe), and that is using the ‘off-setter’ app, which will allow me to enlarge (or shrink) the design and keep the lines parallel.
I might not be able to get to this until tomorrow. I’ll check back in to let you know how it went.

Also, I got the answer concerning the cut types. As you know - and I did not - the cut types from which one must choose when bring in an image, is the same as the cut settings in the cut drop-down - despite the fact that the names are different. I made the request (begged actually) that they make the naming convention the same so that the uninitiated such as myself won’t get stuck on this in the future.

so… I have my marching orders, wish me luck.

thanks to all of you!
(I appreciate that this forum exists, I feel a bit like a babe in the woods, and love that those of you with knowledge are willing to share and help.

All my best,

Joe

How to share an easel project is shown in the 2nd half of this > https://www.youtube.com/watch?v=qX9gEkbX0v4

the cut types are in fact the same and bear the same names.
If some of the cut types are not allowing you to apply them to your design this is usually because an OPEN design has been imported, rather than a fully closed design shape. IF you CLOSE the shape than all cut types will be allowed.

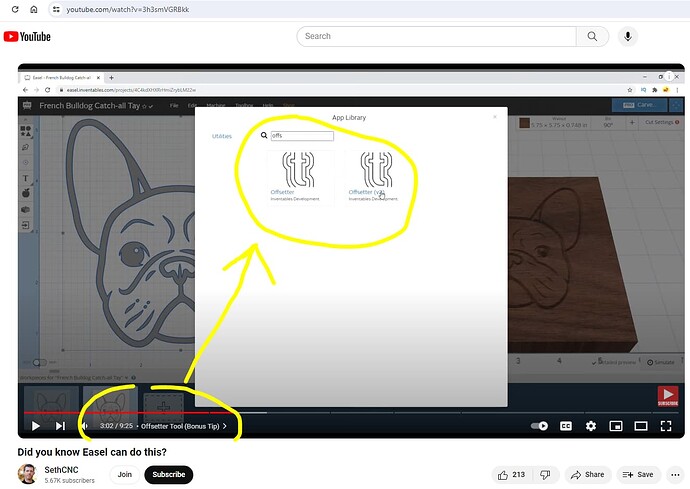
You’re right, that’s why in the video I did not do as you’ve described, I use the offsetter V2 app.
In fact, here’s a screenshot of the timestamp and I even labeled that section of the video accordingly…

you’ll actually want to use the app called “offsetter v2” not the original one without the “v2” and this is also shown in the dog tray video…

Now My questions> Did you import an Image or a SVG/DXF?
…If importing an Image I highly suggest converting that into a SVG prior to importing (the video referenced in the opening of the dog tray video shows how I convert images into SVG’s using inkscape , it does a much better job than Easel does, but there are more steps to get it looking perfect.)
…If importing a SVG/DXF than it would appear that, based on some of your comments, that the imported file was not properly set to automatically CLOSE the shapes when the SVG/DXF was saved, and this could be the root cause of your issues with cut paths…

Thankyou Seth!!

  • I will try to share the project shortly (first I’m attempting the instructions sent me by Tec Support, and then actually make a carve… might be tonight or tomorrow before I get back here.

  • please do not take this as belligerent or obstinate, but the name ARE NOT the same. Here are the two different sets of titles. While they sound similar, they have different names, and thus my confusion:

On import:

“Fill”
“Outline (on Path)”
Outline (Outside)"
“Outline (inside)”

From the "Shape/cut’ menu:

“Clear out a Pocket”
“Cut on shape path”
“Cut outside shape path”
“Cut inside shape path”

Again, once one knows them to be the same, one can see which is which (one must still ‘presume’ that “fill” and “clear out a pocket” are the same). But as the names are in fact different, an honest assessment can see the confusion. And when nothing I tried would get it to carve out the center of the image, questions naturally arose.

  • Seth you are correct, but that does not make my observation incorrect. you did in fact import the image multiple times, and as mentioned, it was very hard to follow to understand that you went to ‘apps’ to use the “offsetter” app. so there I was attempting to enlarge the image and have it remain parallel. Now that I know how it is done, I can see in your video that it is in fact what you did. Again, PLEASE accept that I am not being critical of your video. I truly appreciate it; I would not even be attempting this project right now if you had not posted it (I know that my knowledge is too limited to attempt this without help). It’s just that it [video] goes fast and is thus hard to follow. Now that I see what I was missing, I can attempt this again - which I plan to do today. (this experience should make it clear to everyone that the software is not ‘intuitive’ and while attempting to make it such is a worthy goal, I don’t believe it will ever be attainable, and thus the constant need for instruction - again, hoping that someone at Inventables is listening).

  • in answer to your question (pardon my limited grasp of computer terminology), I did not import a custom image, I simply chose a heart shape from the Easel options in the “Pro Design Library”.
    I do know that I have to convert images before I can import them but am nowhere near understanding such at this point on the learning curve, and so for now, I must stick with the “Pro Design Library” for the time being. Until I can carve out the time to learn how to do conversions (because no one in the computer industry has seen the light and decided to write a program to simply automatically make such conversions (do so and become rich beyond your wildest dreams) - which is WELL beyond my wheelhouse, and until such time, I’ll need to continue to learn through videos and online classes). So, it is my assumption that this is not at the root of the cut path issues.

And for the record, I recognize that the trouble is me, and the limitations of my understanding of how to ‘work’ the software. But I’ll keep getting up and brushing off my knees wiping the wounds and trying again… thanks for holding the bicycle seat for me as I learn to ride. Again, I TRULY APRECEATE the help. Now back to working on the design, and then back into the shop for the first rough carve - wish me luck!!

PS, in the highly unlikely event that it is not patently obvious, I am an experienced woodworker attempting to learn how to implement computer technology into my repertoire - NOT an experienced computer guy attempting to add woodworking into my repertoire. I recognize that this is the future of woodworking and am simply trying to stay competitive - and thus MUST learn to master this - or starve.

Hi @JosephJohnson1 Joe,

First off, I want to say that I am still pretty new to all this CNC stuff too. I’m not even a year into this yet, so take what I say with a grain of salt. Seth is MUCH more experienced than I am, but with experience sometimes comes assumptions that us inexperienced should know more than we do.

I am following along with your posts here, and trying to replicate what you are doing. I wasn’t sure if you were drawing your own design, importing an image (SVG, DXF, or JPG), or using the Pro Design Library. Now I see what you are talking about in the Library. I did a search for ‘heart’ and lots came up. I don’t know which one you chose. I chose the second one because I liked the deeper groove and pointier tip, and it is already a solid fill, which means it will want to carve it as a pocket.

Fill is going to give you a full shape, which should want to create a pocket of the whole heart, which is what you want.

Outline (on path) will give you the shape and the vector will be based on the line of your path. Choosing this option means that it will not cut the whole heart as a pocket, it will just do the outline.

Outline (outside) will give you the shape and the vector will be outside of the path. You might choose this if you want to have text inside the heart, this way the heart can stay away from your text.

Outline (inside) will give you the shape and the vector will be inside of the path. You might choose this if you want the heart to be inside of another object.

I’m sure that there are good reasons for each of these options, but I really only use two. Fill, and Outline on Path. Everything else I can control and I can change it later as well (which hopefully you will see and understand here as I continue).

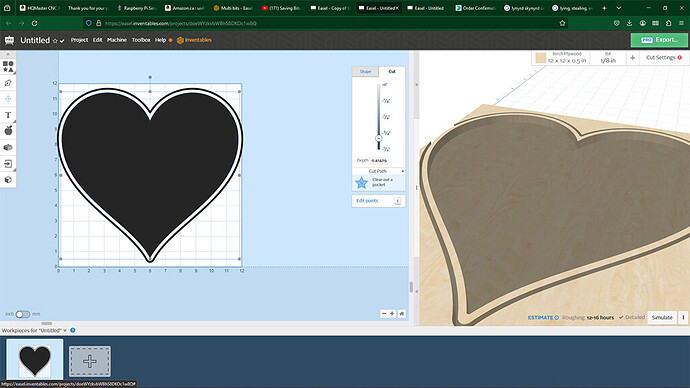
When I choose Fill, it creates a shape which I can size up, and it is already set to Clear Out a Pocket, and the preview window shows what I want, I just need to choose a depth. I have changed the depth as you can see, just so that it gives a clearer indication that it is indeed going to clear a pocket.

Something to note at this point is that the dark outlines means that is what is going to get carved. Anything that is white will not. Simple black and white images are pretty easy, but if you start importing colored objects (which will be converted), sometimes what you want to not get carved actually will because the color indicates that it should. You can select areas and change the cut to outline. This may be confusing right now, so I will see if I can come up with an example to show you what I mean, but for now I am just going to stick with what I believe you are looking to do.

Now, at this point, I am going to add something because I believe (or at least what I think from what I am reading), is that you would like an edge. As if you were to make this heart like a bowl, for lack of a better description. This is what the Offsetter app is for.
Here is an example of what I am talking about, sort of. This heart has a curved edge, and what I am explaining to you here is going to be sharp edges, but I think it is still the general idea you are looking for.

Click on the heart to select it. It will show you a bounding box around the heart (that’s the lines with the squares for stretching or shrinking, etc). Pause for a moment here and bear with me, because this is important. The first thing that you need to do is go to the Cut (and Shape, but select Cut) toolbar, and change your Cut Path to ‘Cut on Shape Path’. Yes, this is going to change your carve and your pocket will disappear. Bear with me. Now with your heart ‘outline’ still selected, select Apps from the toolbar (Lego piece) and under Utilities, you will find Offsetter, and two icons below that you will find Offsetter (v2). Select v2.

It will ask you for some options and show you a preview of what it will look like. Distance is the amount that you want for an edge. I am just going with a quarter inch edge, so distance is 0.25. I want 1 Iteration - just one edge. You can make it go inwards if you want, or if you need to stay within your workpiece or other objects. I am choosing to Keep Original, because I do want the two lines of the heart. Import.

So now you have essentially two hearts, one inside the other. Select just the inside heart (not select all), and go back to the Shape and Cut toolbar, and select the Cut Path as Clear a Pocket. Now you should have two hearts, one cut as a pocket, and one as an outline.

Now select just the outside heart (not select all), and set the depth slider all the way to the bottom to do a through cut.

Now you should have a heart shaped bowl, which is what I believe you are trying to achieve?

1 Like

Thankyou Jordan,

yes, I was trying to carve a heart with text at the bottom. I am aware of what the four carve types are/mean, however, for love nor money I could not get the software to accept the carving out a pocket. with much expermentation and deleting re-importing-deleting, etc… I somehow bumbled upon making it allow me to carve the pocket. It was during this series of frustrations that prompted my question concerning the carve choices upon import, and the carve choices from the cut drop-down menu.
As previously mentioned, they have different names, thus my confusion. While on the phone with Inventables Tec Support, I learned that despite their different names, they are in fact the same (I put in a future request that they eliminate this confusion by adapting standard language for both sets of carve instructions).

moving on

during my initial test cut, many various problems arose - some that had plagued me in previous projects (pocket cuts in steps, and detail bit does not match those steps leaving a strange ‘ridge’ along the bottom, text not carving (the bit remains a mm above the surface despite ‘beleiving’ that it is carving, and I had to manually lower the bit by opening the collet grab the bit, pull it down, and retighten, then when it does a through carve, it goes too far and cuts a 1/8" into the waste board, etc… with the biggest PIA being that on the outside ‘cut-through’ the system somehow thought that I wanted to cut on the other side of the shop, and the gantry was slamming against the stops making all sorts of noise as it tries to carry the spindle off of the machine - slamming into a clamp and breaking a bit in the process).

I accept that much of the problems are operator error (if there is such a thing in an ‘intuitive’ software - which I believe is an impossible dream - AI save me!!)).

Anyway, I went with the old standby - HARDBOOT the system and try again.

after several fails and disasters, I ended up with a heart shaped bowl with carving inside (it was suggested that I do not trust the software and machine to do that lettering carve at the bottom of the pocket based on surface measurements (ODD to say the least), and instead I did this project as five separate projects, measuring from the bottom of the pocket to make that carve.

in the end, I got a heart-shaped bowl with carving at the bottom, and discovered in the process that there is much work to be done in easel on the part of the designers before such a project could be mass produced for a profit (no project that requires five separate carves to complete could ever be profitable), so for the time being, I will abandon this project as a potential income source.

back to the learning curve to learn how to do inlays… already ran into a question with that this morning and am awaiting a call back from Tec Support (mainly, what cut choice is needed when importing an image, text, etc… in order to use the inlay app???). again, ‘Intuitive software’ is - at least at this point - an impossible dream. So, my learning continues.

In case anyone is interested, I have one example of a complete fail for this project:

as well as the one that worked (I made the second one smaller as I did not like the rough cut once it was completed):

to be honest, I am not sure why the first had multiple FAILS and the second one worked. The second one is just a scaled down version. (BTW, the first screen of each project is the master, and no cuts were made from those. The Tec at Inventables suggested that I break the carve down into multiple parts (ultimately being 5 separate carves). As mentioned, this got the job done, but with the added time and labor of doing it this way, would price such a product out of the market and I’d need to learn to love Raman if I were to attempt to feed myself doing projects that requires that much time and work - grin. Either way, I think that rebooting and starting over may be what fixed some if not all of the issues. It is very frustrating to plebians such as myself that problems exist for which the solution is “I don’t know, try turning off the machine and turning it back on and cross your fingers that you don’t break another bit this time.” But it is what is, and at least I’m learning.

Hi Joe,

I’ve been busy working on a bathroom reno and haven’t been online much.

I’m glad to hear that you got things figured out, or at least made something work. There is no consumer level or hobby level cnc machine that is going to be intuitive enough to know what is happening in your imagination. The ‘intuition’ is your job. Don’t take me wrong, I’m not trying to be degrading to you at all. These machines are just that - a machine. It has no idea what it is doing, it is just doing what it is told. I struggled pretty hard for the first 2-3 months because I didn’t understand why things weren’t working the way I wanted them to and I had to slow down and do some basic simple stuff in order to start to understand. I also found that my calibrations were wrong, and my z-chassis was loose, which continued to change my depths until I figured it out. There are many factors that can have a detrimental effect on what we are trying to do, and the machine will often not tell you what the issue is. Watch, listen, and ask questions.

I have been working with these machines for about 10 months now, and am still not super comfortable with using it to make things for profit. I still need more knowledge and experience, but I’m feeling a lot better about it now than when I started. At least now I can recognize if the motions are right or not, or if my depth is off, I can stop it right away, and then look into why.

My best bits of advice for you are:

  1. Home is your friend. Use it often. When a job is done, use Home to go back to that 0,0,0 position. It might not actually be 0,0,0 but it should be consistently the same place. When you change your bit, go back to Home. If you hit a clamp or a belt skips, Home. That is your number 1 point of consistent reference.
  2. Set your Work Zero from Home. Not at Home mind you, but if you start at Home you can keep track of how far you moved to get to your Work Zero and be able to go back there even if you lose the Work Zero setting. I always keep track of it in a notepad document.
  3. Zero your bit before every job. Especially if you have changed the bit. Get in the habit of doing it before every carve, because I have found that with both of my machines, it can change when you cycle the power. I also use a piece of paper to zero, and not a probe.
  4. Watch and Listen. Strange movements or vibrations are a sign that something is loose, or your Feed Rate is too high. The sounds will also tell you. If it is a steady sound (normal), then you are good. If it is jerky, or moaning, or sounds laboured, you may be going too fast or too deep per pass, or you could be going too slow (which you can often see by darker chips or dust, or smoke.

I gotta tell ya, the learning curve on these things is tough. There is a LOT to learn, and you need to be really patient.

One more thing! Don’t loosen the collet and move your bit to get the depth you want. That is very inaccurate and will cause you more problems. Set your Z-zero manually with a piece of paper.

I know it is really frustrating, but you will only get limited help from the machine manufacturer to ensure movements and calibrations, and the software folks can only do so much without being there to see what is happening. YOU are the intuition. Keep at it, and take a break if it is overwhelming you. Go back with a calm mindset. Every person on this forum has had frustrations of their own even if they don’t say it, and as a result, there are lots of people here who have the experience to help.

Cheers!

JordanLee,

Thank you for that, and apologies that I’m just seeing this now. I’m scrambling to get the shop set up, and as is life for most of us, it’s “one thing after the other” (the 3hp motor in my saw just died, so that’ll occupy me for a while).
Much of what you mention above I learned the hard way, so wish that you and I met 6 months ago when I started down this road :wink:
As for loosening the chuck and lowering the bit, I had little other choice. Multiple runs, and all of them with the spindle too high above the workpiece, and Christmas breathing down my neck, I had to get the job done, so my analog mind took over, and got the projects finished. No one at Inventables could explain it other than constant rebooting, clearing/reloading the firm wear, etc… for now the problem appears to be dormant (the ghost must be sleeping).
My comment about ‘intuitive software’ was part tongue-in-cheek, and part frustration that there are no available classes to help shorten if not flatten the learning curve. I’ve been told most of my career by computer programmers that their software is ‘intuitive’ and so manuals and/or classes are unnecessary. I have yet to find that to be the case with ANY software, this is no exception. That is not a complaint, only a reason why a week locked into a shop at the Inventables headquarters is EXACTLLY how every beginner should start their journey (in my past life I was an Account Executive in charge of training our customers - we did so free of charge, because we assumed that top-notch training makes better customers, and better customers equates to MORE customers. The philosophy appears to be correct, given that my old company is currently #1 in its market space).

Anyway, thank you for the kind words and advice. I am about to hold my nose and lay the first of 2 pieces of $98 plywood on the wasteboard, hit ‘carve’ and pray that at the end I have a pair of cabinets for my shop. I say, ‘hold my nose’ and ‘pray’ because given that not a single project that I’ve done worked correctly on the first try… well…

wish me luck.

PS, I am curious concerning your ‘piece of paper, not a probe’ comment. Could you expound??

This is a fairly reliable method for setting the Z-Axis Workpiece Home position. A standard piece of paper is ~0.05mm - 0.1mm thick. Knowing this, one can lower the bit in the smallest increment possible while slightly shifting a small piece of paper between the bit and the stock. When the paper gets caught by the bit, just raise the bit a specific amount…say 2mm or so, remove the paper, and lower the bit back down the amount you moved it up plus the thickness of the paper. For instance, in this example, I would move the bit up 2mm, remove the paper, and then move the bit down 2.1mm. Then just set the Z-Axis Work Home position at that point.

It can take patience and a little practice, but it can be reliable.

That being said, it will never be as precise or reliable as an actual Z-Axis probe will be especially for two-stage carving.

{:0)

Brandon R. Parker

Hi Joe,

I have a probe for my FoxAlien machine, and I think it is an unreliable piece of junk. Brandon and I will disagree on what is more reliable, and you will make your own decision after trying both methods.

One thing I will say about a probe is that you have to specify what the thickness of the probe is - they are not all the same. Even following that, I found that my Z-position was not correct, but I find a piece of paper to be reliable and analog (I can see it), which I prefer. I will not insist that either method is better. It is what works better for you.

Anyway, as Brandon said above, except I will expand a bit on how I do things. I like to set my Z-zero directly to the piece, and typically close to the middle of the work that I am going to carve. If for example I was carving a circle, I would move my bit to the middle of said circle, and then lower my bit at the center of that circle. I use a small piece of newspaper, because that is a very thin piece of paper, and I have a plentiful supply. I lower my bit until it touches or is just about to touch the paper. Then I change my Z step size to 0.1mm, lower the bit, and move the paper. Lower it another step and so on, until the paper will not move or will tear if it does move. I set Z-zero there. I change my step back to 5mm, raise the bit, remove the paper, and I am ready to carve. I find this to be more reliable than the probe, because with the probe it never actually touches the surface and you click Carve expecting it to work properly and don’t really know for certain that zero is where you want it to be.

For two-stage carving, I do the same thing. Change the bit, HOME, and then move to a spot on the workpiece that has not been carved, put down your piece of paper and lower the bit in the same way.

Brandon or others in here may be able to help you better than I can if you do wish to use a probe. You have to set up your probe for thickness and there is a setting that needs to be correct in order for it to work properly.

Although I use Easel for design and creating my g-code, and I have tried several times to use it to do the carve, I do prefer to use UGS (Universal G-Code Sender) to do my carving. I really like being able to trace my work (which I can do in UGS, but not in Easel) before I hit start or carve, and it tells me more information and shows in real-time what is happening. Everyone has their own preference, and you will find yours.

Good luck with your cabinets! I am working on building two bathroom vanity cabinets right now. One I am doing old-school by hand, using pocket screws, dowels, glue, saws, handheld and table router, measuring and using my hands and brain. The other I am doing on the cnc (and designed in Easel) just to see how it works out. So far the cnc cabinet is taking significantly longer to do (like four times as long for a cabinet half the size), but when it is done I will have the files and should be able to reproduce it without having to use my old tired brain. :wink:

I do want to ask you, because I scrolled through and I didn’t see where you may have identified your machine. What cnc are you using?

1 Like

Thankyou Brandon. I had suspected that you were using paper as a feeler gauge but did not want to presume. I’ll give it a try.

Thank you JorddanLee,

I too have always made cabinets the ‘tried and true’ way, and as I believe I mentioned above, started to make my first cabinet with the CNC only to give up and make it the “ol’ fashioned way” because I could do it in much less time than figuring out all of the ‘work-arounds’ necessary.

I’m now trying to make VERY basic hanging cabinets and ran into MAJOR problems… Thankfully I chickened out at the lumber yard and bought the $39 particleboard, instead of the $98 Baltic birch plywood (when did that stuff get so expensive ???)

Long story short, my machine wanted to leave the shop (slamming - HARD - against the limit switches and starting the carve at the edge which should have been about 6" in from the edge. Then it carved too deep, which meant that there were no tabs, so the panels cut loose and got destroyed by the bit. Then the machine attempted to cut other panels on top of the panels that it had already carved… a total and complete disaster/FAIL… I do not even know where to begin to break down all of the horrors that happened on this first attempt. I’m awaiting a call-back from Tec Support. Thise guys are great, and I can’t speak highly enough about their help. But I really think that I need a Catholic Priest’s help… I mean, this machine/software sure seems to be possessed.

anyway, to answer your question, I have the 4’ x 4’ X-Carve Pro.

Like you, my plan was/is to make items, break them down, get them programmed into Easel and then be able to mass produce at the push of a button. That goal is actually moving further and further away from me as I discover nothing but issues/problems, and it appears that every task requires some sort of “work-around”… but in fairness, I’m a rank amateur, and at least for now, I’m willing to blame myself for these mishaps… we shall see.

All my best,

Joe

@JosephJohnson1 You need to spend time getting to know the machine and how it works. In your woodworking, you can solve problems because you understand your tools and your material.
If the machine

and you don’t know why, you’ll do it again.
You can watch all the videos and write endless posts here and listen to countless people show you “how easy it is”, but, you know, nothing beats experience to gain true understanding.
Despite advice from others here, I’d recommend using a user interface that makes it obvious what the machine is doing as a result of what you do. Gcode is, at it’s simplest, just XYZ coordinates. Entering commands, setting zeroes, moving the machine around by giving it direct commands will help you to understand. Then, when you crash, you’ll know why. Just like when you cut a board too short or cut a miter the wrong direction.

1 Like

Neil,

I understand what you are saying, I just don’t have a clue how to do what you are saying. Shy of becoming an avatar in the game of x-Carve ‘Tron’, I have no idea how to figure out what is happening inside of a digital program.

I am an analog man trying to make it in this digital world. Your example of cutting a board too short hits home because I can see and touch a board that is cut too short. I can see EXACTLY what I did wrong and learn from that mistake.

As to why the gantry wants to leave my shop, that is way beyond my comprehension. I can’t SEE those little x’s and o’s that make up digital code. What’s more, after a half hour on the phone with Tec Support, they are going to get back to me.

We think that we figured out why it is cutting panels on top of already cut panels… apparently the software does not understand tiling (I guess it was a programing oversight), and instead of hitting ‘carve’ I should have exported it into Easel… I didn’t know that I wasn’t working in Easel. Perhaps they will remove the ‘carve’ button until it is ready for primetime.

Why did the gantry want to move 6" beyond the front of the machine, and since it could not, it cut the dado halfway off of the board instead of 5" further back… that’s anyone’s guess.

Why did the gantry fly at full speed toward the back of the machine almost breaking the supports off??? we are guessing that since ‘tiling’ was apparently not programmed into the software, Easel mistakenly thought my machine was 8’ long…

again, I’m not a computer programmer, so I cannot speak with authority, but it seems that the machine’s dimensions should be the first thing programmed into the software.

in short, to “…spend the time getting to know the machine and how it works.” is made exponentially more difficult when the machine does not do what it was programmed to do, and confuses the people who made it.

I rebooted both the machine and my computer (as I learned the hard way that I have to do multiple times a day). I homed the machine TWICE. I probed the bit TWICE, and yet, it did not know where ‘home’ was, and it did not know where ‘Z’ zero was. I checked, double checked, triple checked the design, and even called Inventables to have them take a look. Had the green light… and FAIL… pile of scrap wood and sawdust.

Just not sure how to ‘know’ it any better than that. But I’m all ears. I am eager to learn. But one can learn only when one has answers… like that short board you mentioned.

I do not want to sound arrogant. I know that I am on the long drudge up the steep learning curve. I just don’t know what - or more importantly HOW - to learn when it has a mind of its own, and when on one carve it cuts the exact correct depth and the very next carve it cuts a 1/8" into the waste board. How do I learn how to deal with a gantry that flies at several miles an hour and smashes into the stops as if it wants to do a carve in the back yard? or when it thinks that the front of the material is 6" in front of the machine? How do I learn from this if no one knows WHY it is doing these things?

My learning curve is getting longer not shorter as more questions arise than answers.

But I’ve invested all that I have in this shop, and this machine as its centerpiece, so learn I must - or starve.

What I’m missing is a teacher.

Ahh, but it’s not. As a woodworker, you understand dimensions and distances. You asked the machine to cut a 18x24 rectangle, but you didn’t know where the machine was measuring from. Using Easel, you programmed it to start at the lower (front) left corner, but did you set your xy zero there before you started the cut?
The machine will do what you tell it to do, but you don’t know what you’re telling it to do.
Don’t start by cutting a rectangle.
Start by homing the machine. Do you know what that does?

I know a guy.

to answer your question in one word: YES

I homed it (twice), only after doing a hard boot of both the machine and the computer. I probed the z axis (twice), and set the X-Y (did not use "use previous X-Y).

So I understand that the software/machine is 'SUPPOSED" to do what I tell it… it just…

…Doesn’t

With that said, while working with Armani (Tec Support) today, he said that the software is apparently not recognizing tiling in the cabinetmaker beta software, and he suspects that is why it wanted to cut two panels in the same space. Okay, but why? I’m not a software programmer, so can’t claim to know the answer. My response to him was that a ‘feature request’ is to turn off the ‘carve’ button if the software cannot yet carve properly. He is completely stumped as to why it wants to cut beyond the front of the machine, or below the dimensions of the material. They are looking into that.

I do not know what you mean by “you don’t know what you are telling it to do” I went over the design with a fine-toothed comb. I know EXACTLLY what I’m telling it to do… it just won’t do it.

I also don’t know what you mean by “don’t start by cutting a rectangle”… the panels for the cabinet are rectangles. if that is an analogy or proverb, I’m sorry but I’m too ignorant to understand it.

I have had nothing but problems like this since I started this journey in October. They have reloaded the firm wear several times. We don’t know why I have to frequently do a hardboot.

Again, I know that I don’t know what I don’t know. So, I do everything that I am told to do, then… hit ‘carve’ and… FAIL.

to be clear, I’ve made my share of operator error mistakes. and from these I learn. This is why I triple checked everything including talking to Inventables staff before hitting the ‘carve’ button. Didn’t make a difference. Scrap wood and sawdust.

as an aside; Aramani (Tec Support) was able to open my error report, but unable to open my project. So he had me share it. I did. He is unable to open that either. Too early to say, but guessing that fact may be revealing something??

Can you share your gcode? Or project?

If you are confident you’re doing things correctly, and there is a bug in the cabinetmaker, nothing we say here can help.

What have you cut successfully on the machine?

When I say this,

I mean…do you know why you home the machine? Do you understand what’s happening under the hood when THAT happens?