
I upgraded my x-carve to 9mm belts and 269oz steppers. I went to do my first real carve and noted the square is a parallelogram (yes a square is always, but you know what I mean). Belts are tight enough. Steps seem pretty close. What is up? You can see that one weird corner where the first layer slipped out. As I need to get this job done, I’m going to carve it on my Tormach (double check flood coolant is turned off!)

The circles are not perfectly round / with flaws is indicative of uneven tension (greater backlash component) between X & Y. When motion transition from X -> Y or vice versa the weaker axis will “trail” behind causing the anomaly. I would also doublecheck any set screws and pulleys for slippage.
As to the deviation in low/outer right corner I dont have any ideas except the bit “dug in” for some reason, another indication of pulley slippage.
If the square is skewed that can also be indicative of a trailing Y-stepper / pulley slippage. (or simply not squared to begin with, but I assume you have control on that part  )
)
Thanks. The shafts on these steppers are D-shafts and I did make sure 1 set screw of the pair is biting on the flat surface. I did use thread locker on all the screws, so I can’t imagine they loosened. I would imagine given a flat surface it would be able to hold even if it wasn’t perfectly snugged. If one axis was missing steps, I suppose a similar problem would occur. I didn’t adjust stepper voltage when I swapped the motors, maybe I should.
D-shafts are nice, especially if the matching pulleys also have a D-slot.
If the set screw is unable to fully lock its possible for it to rock back’n’forth a little when force is applied.
I am not stating this is the case here, just mentioning it because its very hard to detect visually, or even during use because the setscrew may hold during “light” motion but start to rock a smidge at heavier jobs.
Yes, the same symptoms would appear if one stepper lack power (compared to the other slaved one)
Do I recall correctly that you have the older gshield controller, or do you have the Xcontroller?
I have an X-controller (I don’t think the G-shield can even drive these motors?)
Ok I squared the stock with a t-square to the Y rail. This was a throw away test piece of birch ply. Sorry the t-square has a little parallax in the photo because of how I had to hold it while taking the pic whiles not blocking the light.
Again I got that weird corner carve. That seems like a repeatable thing so I guess it could be a bad path planning on v-carve’s part. The 3D carve of the molding came out beautifully smooth. The weird part about the corner is right there the layers don’t align but the rest of that pocket is perfectly aligned.


Can you share the gcode for the square?
The circular pockets and the square pocket are in the same file (sorry).
Z axis have any play?
No, that’s solid as a rock (it’s the cnc4newbies ballscrew one with linear rails.
Do Vcarve generate a lead-in? Could be a bug in the PP because I’d agree with you that the anomaly is a weird one. (I havent checked the supplied gcode)
How would the square come out if designed/carved via Easel only?
Ooh. That’s a good thought. I can try 2 things, one I was planning if I couldn’t make this work to run this same job on my Tormach. I was only hesitating as I normally use that for aluminum and steel and so use flood coolant (with my own high-volume coolant pump) so while it’s easy enough to turn off the coolant pump while doing wood, the entire enclosure is kind of sticky inside from all the coolant that has splashed on the walls/doors, which I imagine the sawdust will stick to like glue. But the short answer on all that was I added the Tormach post-processor to my v-carve setup.
And as a backup to my backup designed the job in fusion360 and CAM’ed it up for the Tormach there, in which case I have total control over the lead-ins. My big hesitation is I have my Tormach’ spindle in low-range so it maxes out under 5000rpm, but has higher torque (helpful in 316L stainless), but not sure how that will work on wood? 9not impossible to switch obviously but a pain in the ■■■) That’s a quarter of the speed of the dewalt… I’ve got spare 1/4” ER20 collets so I can use the Amana 1/4 straight 2-flute and ball mills from the x-carve instead of torturing my 4-flute kennametal End-mills, plus everything I’ve read, 4-flutes are much worse in wood, although seeing what an AB Shearhog could do on wood is intriguing, it’s a little pricey to beat up in an experiment.
Why not try from Fusion to the X-Carve?
I don’t think it’s a toolpath issue. V-Carve does a zig-zag “ramp” which is slightly better than a plunge. A true ramp, like what Fusion can do will definitely help, but that really looks like you have some slop somewhere.
Last this happend to me, after following the tension / motor currents / squaring with no success, I found the problem was that the set screws on the x axis were too tight, causing the v-wheels to slightly snag on motion start. I untightened them a bit and all was good again.
Not sure this is your problem, but it looked very similar…
Good luck
1 Like
In the need to get this done, did some test running here on the Tormach and hopefully tomorrow will get it done in the final walnut after testing on this scrap Maple. The z-stepdown on the pocket was .125" by default which was waaaay too harsh, but big and heavy beats chatter! Had that been my usual metal that mill would have snapped:

I adjusted the circular pockets into an adaptive path for the real one. The pockets look lovely.
On the Tormach? In Maple? What sized endmill?
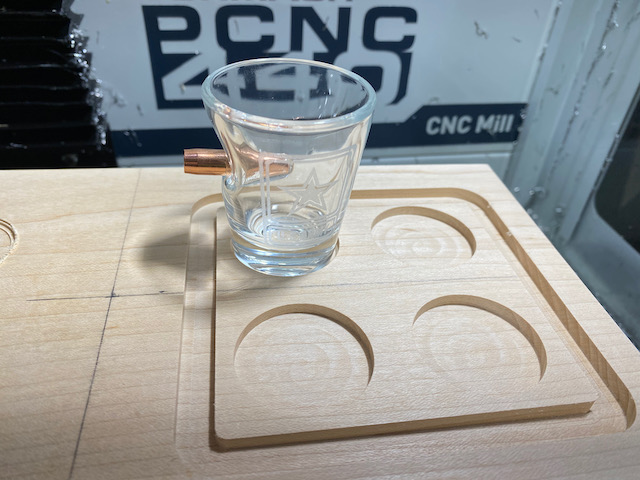
Here is the “real version” in paduk. Came out beautifully, although I think I set the DOC too shallow on the adaptive for that rectangle. All cuts were with a 2-flute 1/4” either straight or ball end:

The 3D adaptive + steep/shallow strategies did an amazing job on the groove in the middle. You can’t feel the edge with a fingernail it feathers in so well… After this it’s off to the laser for 3D engraving the logo in.
1 Like
For folks that are curious I initially tried to export the project from V-Carve pro using the path pilot (Tormach) post-processor, but my Tormach kept reporting g-code problems (Tormach is looking into one weird error for me), so again for expediency I remodeled this in fusion 360 and used that CAM (my usual CAM for my Tormach). It required a little hardware work as I normally m]have my 440’s drive belt in low-range for extra torque (driving a 1/2” KOR end-mill through aluminum with that spindle can stall out at high-range, and the chip load is too high at those speeds anyway for that machine - and before someone brings Titan into this, he’s an expert with actual machinists working for him and if he breaks his mill he just plops the project onto the DMG-Maori or Doosan and keeps going, I’m a doctor in his basement with the excellent 1-week Tormach machining course under his belt for training).
Now why the 440? if it’s not quite what I needed power-wise, well originally I wanted a 770mx at least, but unfortunately the ceiling in my workroom doesn’t clear the drag-chain of the 770 or 1100 mills. I would love to have had those machines as they are much better designed for flood coolant and the servo drives are superb. And while it is a suspended ceiling with a lot of space above the tiles to the joists, my wife being the fun-killer didn’t think I should cut a hole in the main HVAC duct for the house right above the ceiling to let the drag chain go higher, and given how hard it was to get the 440 into the basement the 770 or 1100 would have been insane. I had to rent a backhoe to lower it down the bulkhead, and use a shop crane to get it up onto the pedestal.
For this project my 2gpm floor coolant system that I built gets coolant everywhere when the spinning tool hits the jets when hogging out aluminum. So the sawdust stuck everywhere on the tacky residue on the walls. The enclosure isn’t quite watertight enough to spray down with a hose normally to get the chips off the walls, so the sawdust isn’t going to be fun to get out…
1 Like
@NeilFerreri1, as an update to that weird jog outside the cut path on the corner as seen above, that turns out to be the crazy way V-carve Pro’s tool path generation does a step-over. I don’t really like their tool path generation in that they do their stopovers with a retract and plunge. Sure you can ramp the entire pocket (which works great in Z) but to step XY it does a plunge move. So if it doesn’t clean up perfectly it leaves those outpouchings. I had a similar problem on an oval pocket last night (although it did successfully clean up the edge). Once you use Fusion’s tool paths it’s hard to use others. But I have to say the post-processor for the x-carve for Fusion isn’t great (I tried it yesterday and it didn’t start my dewalt (but did strangly start my “flood” (which is really my dust collector)), luckily I had mis-cut my stock so it was air-carving with the spindle off for a second - amusingly I spent like 30 minutes debugging the g-code for the job last nigth why the holes I was cutting were off center, until I finally decided to double check the stock I had cut (Apparently I had cut the plywood 3" to small… luckily it’s just 1/2" CDX so pretty cheap mistake). So no mistake in my CAM job just a mistake in my table-sawing…

Those hops that cause that outpouching.