
Initial thoughts, slide well “under load” aka I push down and slide them. No visible issues. So it begins, I will try and keep good records of my process
2 Likes
any progress on this?
Minimal, I ordered the nuts and screws from eBay and didn’t look at the delivery dates. They should be here any day now.
T nuts and screws are here. I made a plate that is I dentical to the xcarve one just replaced the vwheel holes with the new one.
It fits!
2 Likes
This thread reminded me of a commercial machine that uses belts with profile rails.
https://3dtek.xyz/collections/all/products/new-heavy-duty-cnc-router-code-name-heavy-mill
Just FYI and inspiration.
Nice people too. The owner of 3DTek helped me out on the noise suppressing capacitors for my ShapeOko2 when the Dremel set off the limit switches all the time.
Your gantry plates look impressively strong, are they 10mm and did you cut them on the X-Carve?
Just 3/4 mdf for fit tests before I cut the 3/8 aluminum.
Thanks! They are using even bigger rails 20mm vs my 15. Would be curious why, the load rating of the 15 seems plenty.
3/8 aluminium makes your gantry 10 times stronger than the steel plates.
With 20mm Hiwin you need about 2,4kg to get the gantry moving and 1,4kg of pull to keep moving. This will stretch the belt and cause backlash. That is why they use a lot bigger motors and belts.
Your 15mm rails seem a better match for the X-Carve belt drive system.
1 Like
Btw, you can skip the NEMA17 holes.
Noticed the nema 17 holes after. Need to make a .375in pocket in that area anyway so the shaft of the stepper actually sticks out.
Did you finish this upgrade
Hi,
I am interested in your progress as well, while waiting for your update, I am wondering what is your plan regarding the X-axis?
I have tried to come up with an idea (see picture below) and would like to have the opinion of more experienced users. First, I apologize for the poor result of my work on the model on fusion 360, evidently, that is my first attempt at doing this. It is not precision work as I just dragged and dropped parts in position.
I was thinking of using 4040 linear rail from openbuilds to take advantage of the channels for mounting the rails.
The sliding blocks at the bottom would be HGL15 and those on the top would be HGH15 according to the drawings, there should be a 2.5mm space between the carriage and the rail, could probably use precision shims/spacers??
Would be able to get rid of the V-wheels which is what I initially would like to do, and the idlers pulley would use the top mounting points of the stepper with longer screws. I am not sure if the belt would touch the carriage that way, I would also need to add something to move the belt’s anchor point on the Y plates upward to the same level as the pulleys.
Please let me know what you think, if this could be a way to do it.

2 Likes
I think I’d move the bottom rail to the front slot too. Not only to minimize leveraging around the X, but also to help solve the next problem: how to align the mount holes.
Then one idea could be to make a jig (while having a functional CNC) for marking/drilling: a block as wide as the X carriage, with one edge rounded over (with a bigger radius than the 3mm) and 8 holes positioned on the corners of two 26mm-sided squares. Having both rails in the front slots, you could use the same jig on the top and bottom by referencing it off the internal face of the X carrier’s front side. This way you have good chance of aligning the holes on both the X and Z axes.
1 Like
Better drawn than told.
top

side
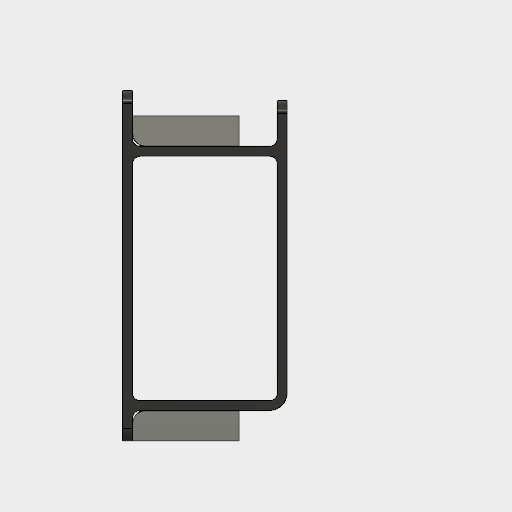
The holes are a little oversized (5mm for M4) to offer some wiggle room.
One more thing… HGL15’s are more rare than HGH15’s.
1 Like
Thanks for your reply, front slot it is then, I just copied the way the 3Dtek heavy mill, a few post earlier, was set up not really knowing what the advantages would be.
It is true that I am dreading having to drill the carriage, and the jig is certainly a safe way to go.
I did not know the HGL were rare, I just looked at the specs on their website and 2 HGH would not fit as when coupled with the rails, they are 28mm thick.
I am going to Hong kong soon and plan on buying them on taobao, the sliders are too cheap to be real Hiwin so I hope the dimensions are consistent to the real sliders. I hope they have them in their inventory and are not just advertising them to attract trafic to their store. It is funny how those vendors advertise their product as being genuine and even showing side by side photo comparison with “fake” ones but for about US$16 per slider, that is cheaper than I have seen on US or EU based websites.
Also keep in mind that in order for the blocks to clear the radius of the inside X carrier cavity, the whole 40x40 extrusion will have to shift backwards. This also brings the rear slot where the belt sits further back, so check your motor’s shaft length to see if it still fits.
Or try a leadscrew outside the X carrier. At this point, it’s an interesting exercise, but it raises again the question whether it’s worth modding the X-Carve to something totally different instead of building something from scratch without fighting with limitations.
2 Likes
i have been chasing flex for a while now on my z. First was bad linear bearings. Now its in the v-wheels. Im gonna work on a new upgrade soon to see if i can reduce that as well.
1 Like
Thanks again, I would need to measure but the new motors I have, seem to have shorter shaft, so I think that should work.
I prefer the belts so far, not that I already tried the screws but, according to the videos I have seen, I find it to be quieter.
I will definitely build one from scratch one day but for now, I am limited to doing some upgrades here and there when the finances allow it and that certainly helps learning how it works and what are my particular needs regarding the machine I would build later on.
That is a very good idea, I was wondering about fixing the rails, but what about the hole spacing on the 4040 rail, will they be the same as the holes in the side plates, I have the one piece X rail and it measures about 50 45