
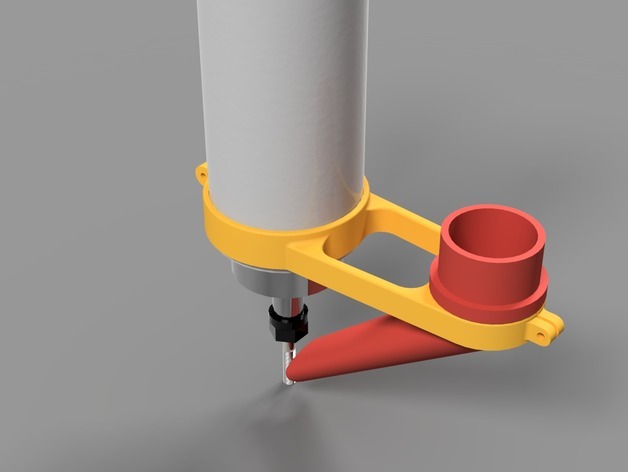
This looks like it should cover the loc line portion, right? I think it has enough line, plus a nozzle and adapter:
Yes, and if you want black they have those parts ala carte. The blue comes as a set. I used Blue first but decided I liked the black. I tried to paint it but it flaked off and jammed up the swivels so I went back to amazon and bought black. (I used the Blue set on my Bandsaw!)
1 Like
Here’s mine. It was my first project and I rushed it so I could work on another. I assumed the cut diameter of the bit I was using was as advertised, so I needed to file the teeth a bit to get the parts to fit.
I used hot glue for the vinyl, which works great. I also used it on the joint, which is coming apart and I will use weldon.
SVG files below, right-click save image as.


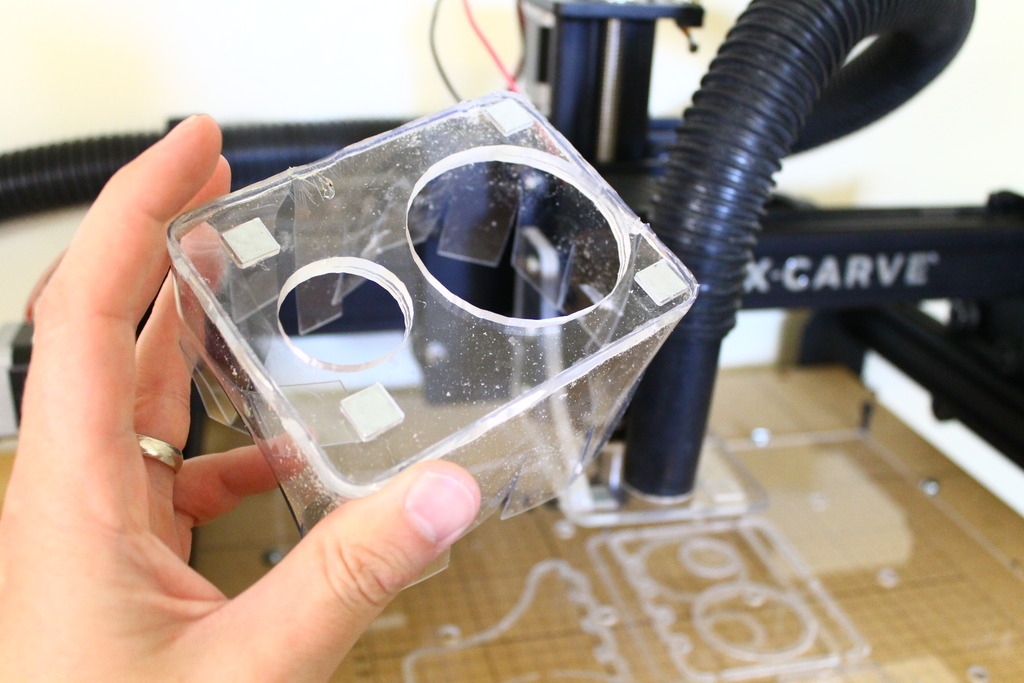
If you use these files, mind that the teeth are drawn to exactly match (no gap). Also you will need to modify the vacuum hole diameter and the shape for your magnets. You also need 3 M4 screws to mount it, magnets, vinyl (mine measures 0.025" thick. 2.8" high, with 1.3" long slits cut with scissors).
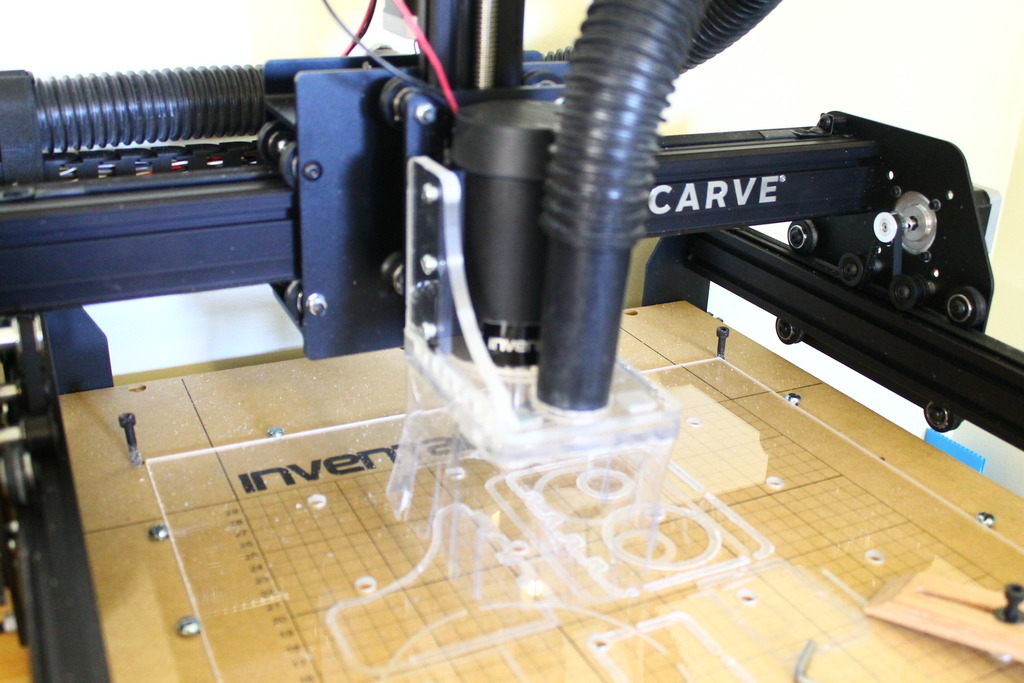
All parts are 1/4" clear acrylic. I’ve been using the 1/8" single flute upcut spiral bit, feedrate of 100in/min and 0.01" passes, with good results.
Overall it works really well. Larger, heavier chips don’t always go up the vacuum right away…I’d say it leaves behind about 5% of the chips when I’m cutting acrylic, but the left over mess is small and almost completely contained.
3 Likes
What are the magnets for?
For two-piece dust shoes like @SpencerShepard’s , you typically have one piece attached to the machine (the left two images), and then a removable piece with skirting (the right image). This lets you easily remove the bottom section to change out the bit.
2 Likes
thats awesome. thanks for the share! i’m likely going to be trying out your design with my xcarve once it arrives. how did you attach the mounting bracket to the top plate? is the motor hold fit exact to help with air pressure escape? acrylic cement?
I used hot glue to attach the skirt to the bottom plate, which worked really well. I decided to see how well hot glue would work on the acrylic joint. I needed it together for another project and didn’t have my acrylic glue at home. Unsurprisingly, it is coming apart after a week. I’ll be redoing that joint with weldon for acrylic (I forget the number…I use it all the time but don’t have it with me).
The hole matches the motor well, but sits about 2-3mm below the spindle holder. You could modify the bracket to raise it up a bit, but I’m not sure it matters too much.
@SpencerShepard if you share the Easel files I’ll add it to the upgrade section of the shared projects. Nice work!
Hi Zach, sure I can do that. For the BOM, do you guys sell the M4 screws needed to mount this to the spindle holder? Didn’t see them in your Fastening products.
Unfortunately we only sell M3 and M5’s right now. We are working on a way to add parts that we don’t sell to the BOM but we don’t have that yet.
What size M4’s do you need?
I found some at my local hardware store, but for someone building the dust shoe it would be handy…metric sizes not so easy to find where I live. They have to be long enough to go through 1/4" acrylic and into the spindle mount…so maybe 8mm long?
I really like this setup Don. I had been considering something in locline, maybe one as a blower with a tight nozzle and a bigger pickup on the other side with suction. Even if the suction didn’t catch everything it would hopefully blast stuff out of the current milling groove.
This computer desk project is KILLING me with how long it’s taking…all my Xcarve boxes are staring at me with disapproval and I just have no room yet…
Thanks, yes it’s been working great for me keeping the cut and groove area spotless with just the vacuum. I would be interested in seeing the air option with it, so post a video if you can when you do it.
1 Like
I’m liking something like this, too…
2 Likes
I tried holding my shop-vac close to he bit like this before I made my dust shoe. It didn’t catch very much. I would imagine the effectiveness really depends on what you’re cutting and the size of the chips. Larger, heavier chips are going to be thrown away from the bit with more force than the vacuum can overcome.
Definitely depends on what you are cutting. Following the cut with the vacuum nozzle while cutting acrylic seems great.
Yep, I’ve been using the “follow with a shop vac” method on plywood/mdf and it’s been working well for me. I’m just using my bottom-of-the-line small Lowes shop vac and it’s keeping up well enough. I did pick up some lock line which I haven’t figured out how to attach yet, so I like @TonyNo’s bracket idea there.
That said, I’ll probably run off one of @SpencerShepard’s dust shoes next time I have some 1/4" plywood up on the machine. Then it’ll be Pepsi challenge time!
Best way for me was to get a T connector with a “screw-in” 3/4 female end on one leg of the T (Its called a female NPT). Then run the loc-line off that female end positioned at a right angle above the spindle (Should just screw right in) and then a 3/4 to 1/2 reducer off the other leg of the T going straight down parallel to the spindle. Then hook about 5-7 inches of 1/2"PVC , then a little 30 degree elbow at the bottom. For the mount - Take a piece of PVC large enough for the 1/2" tube to slide inside and drill pilot holes aligned with the mounting holes on the spindle. You will need to drill larger holes straight across from these so you can get your bit driver through the tube and into the interior where the fasteners are. Just Dry fit these joints, no need to glue and seal, it will make installing and removing easy too. Ok back up at the top to hook into your vacuum hose I suggest you just take the hose with you to the plumbing supply and have as associate help create a union that will adapt from the 3/4 leg off the T to the size of your vacuum hose.
The reason you do the dual tube is to reduce the chips that escape that people are mentioning with that other design. Having suction from both sides make a huge difference. The reason you fashion it to slide is so if your tubes contact the workpiece or clamps the whole thing slides up out of the way instead of messing up the workpiece by throwing off the spindle. these other designs are great but as your bit depth changes they do not allow for adjustability and clearance. Plus the “shoe” type designs are hard to see the bit clearly, even the clear ones. I made a few spacers for "standard bit depths to get the vacuum tubes just above the cut. (More on that is outlined above).
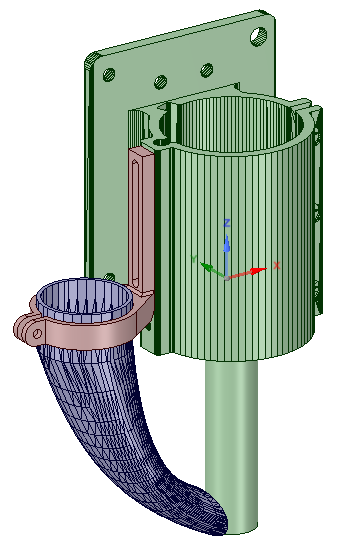
like the design. my only concern would be the shoot hitting the material or hold-downs … thoughts?