
Hey there everyone!
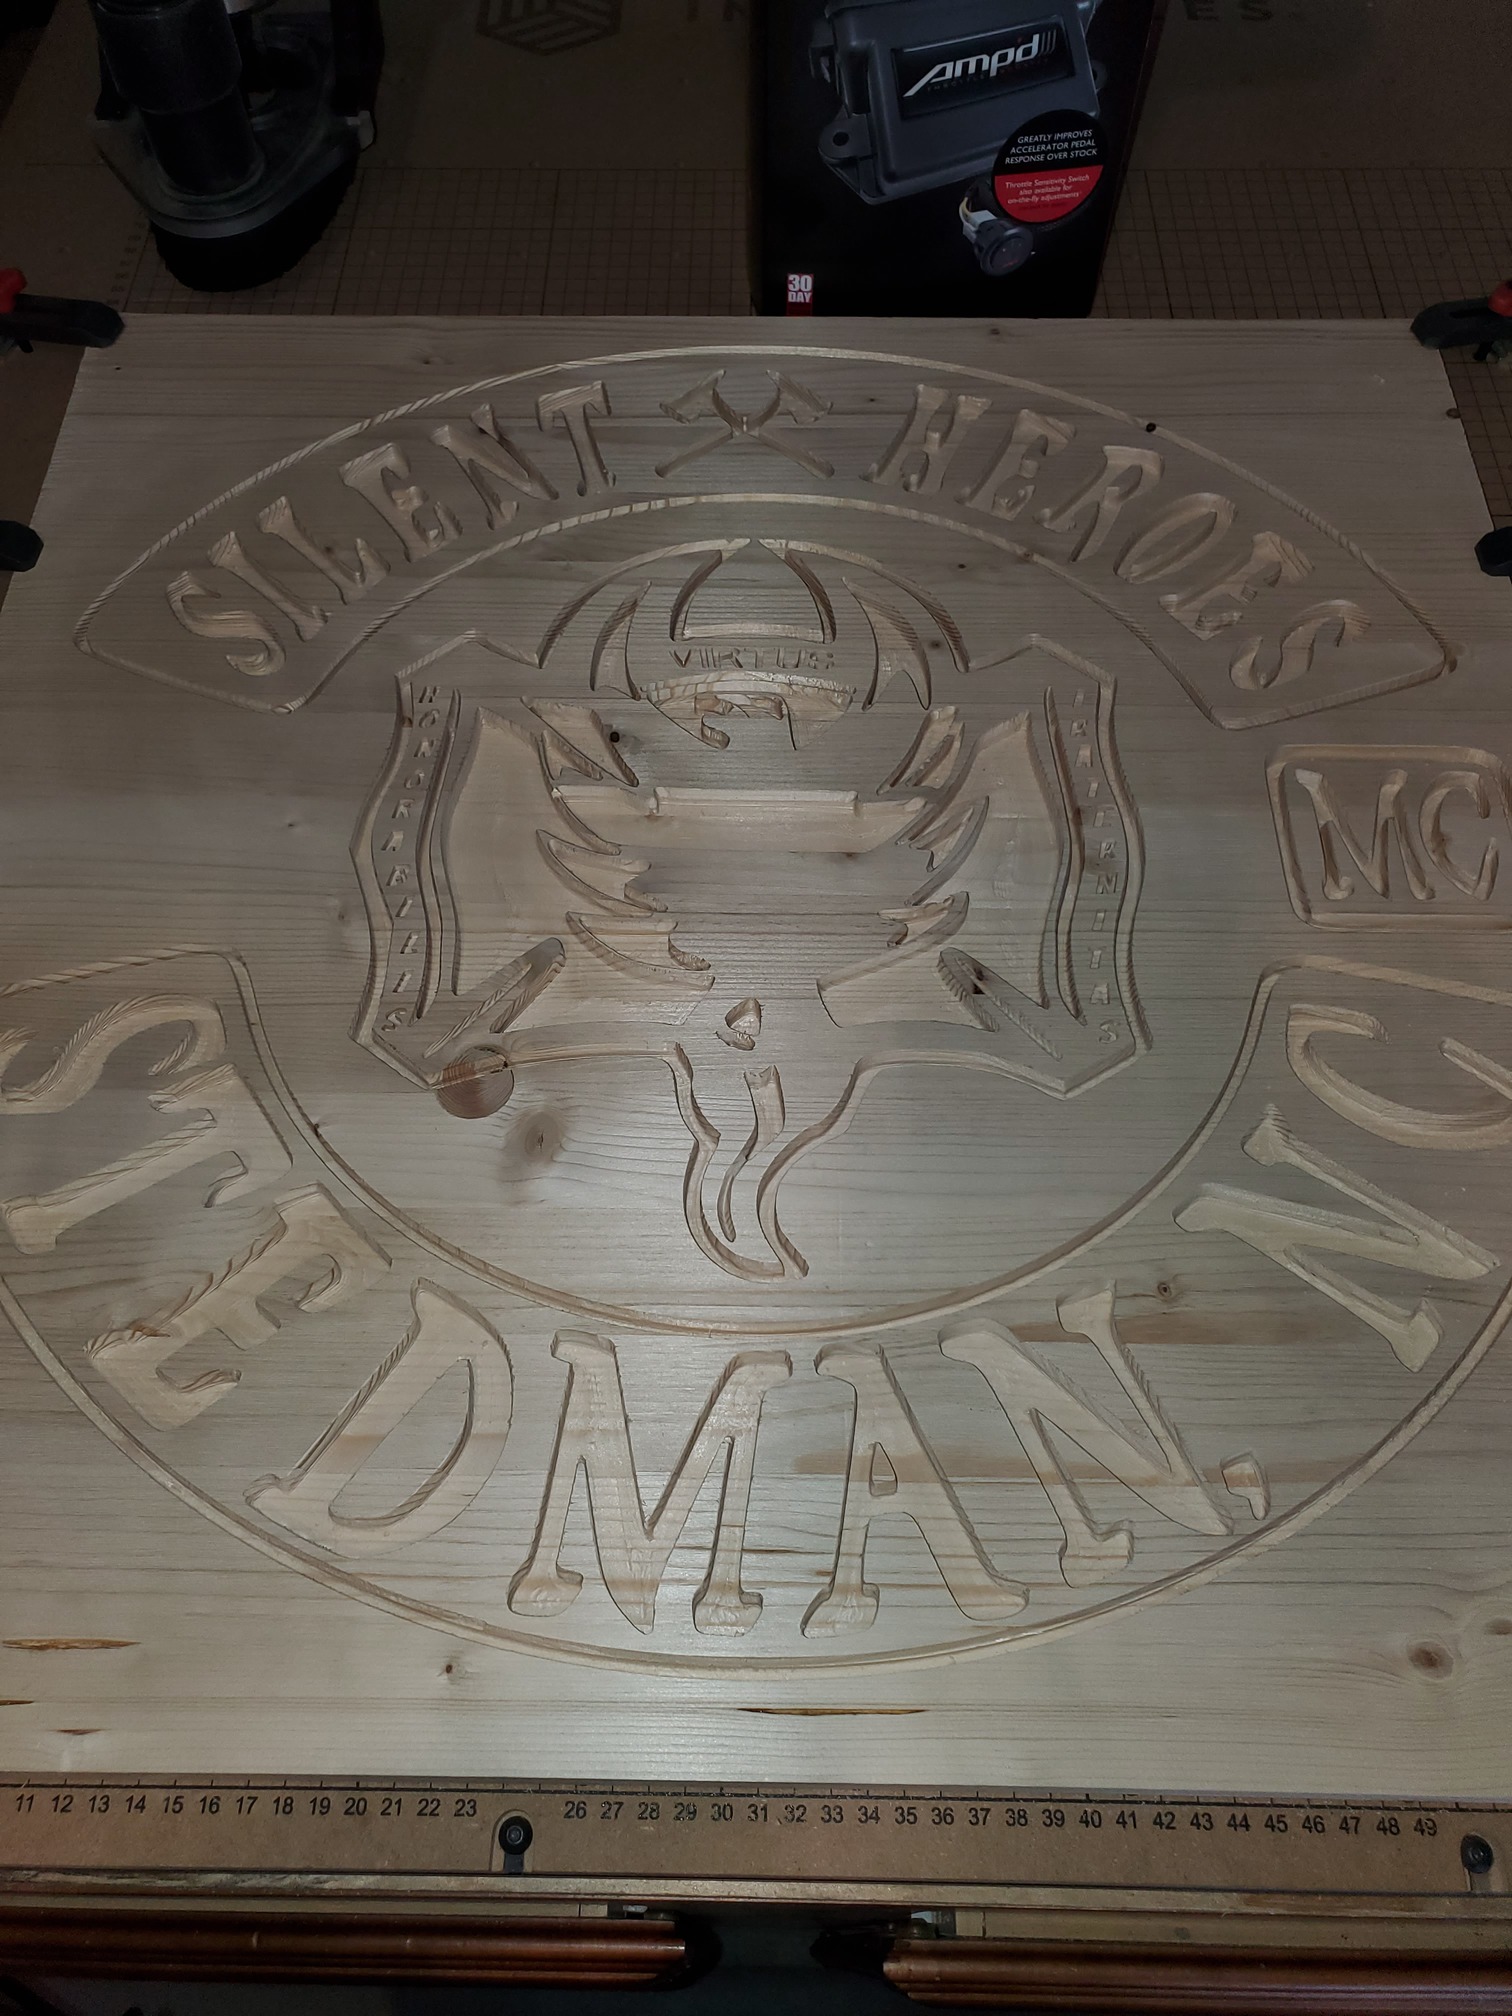
I just finished my first large project for a customer. But I’ve having an issue with the bottom of the carve being rough. I used a 1/8" for the rough pass and a 60° for the detail pass. Both bits are brand new. Belts seem tight. But as you can see in the images, the bottom of the carve is uneven and rough. I received it at a lower depth and the results repeated themselves.
What could be the issue? !
20200508_152915|375x500


What 1/8" bit are you using?
First pass was with the straight 2F black band.
Second was with the upcut 1F grey band.
can you share the file? I had a similar issue with a carve last year. I did go back through and tightened my v-wheels on my z-axis as well as changed the cutting pattern from offset to raster it helped out a lot. Also I do not use the 1/8 straight flute(black band) for cuts like this as it will tend to leave a line. If you look at the tip of the bit you will notice that it goes up in the middle. This was what was creating the lines the I had.
This is the thread to the issue I had. There is some great advice from members of the forum that you may find helpful as well.
1 Like
That’s the problem, that 2 flute bit is not flat on the end. This is a picture of the tip of the bit

I can see a few things…
- It looks like there is definitely some difference between the Roughing/Detail Z-Axis heights. You can see this in the large areas close to a corner.
- If there are large ridges on the bottom in the middle of where the Roughing carve was then this is normally a sign that your Z-Axis needs some tramming (i.e. it is not 100% perpendicular to the X & Y Plane of travel.
- There seems to be some tear-out in some places, so we may have to revisit the thickness of some of the lines on that design. Either that or change the wood species; it looks like that is a softwood?
{:0)
Brandon Parker
Hey man I appreciate you sharing that post. That looks identical to my issues and I will take those tips into consideration on my next carve!! Thank you again!
Dang I never realize that. That could be a source of a lot of my issues. What is that bit good for?
@BrandonR_Parker:
Hey man, how would I ensure the Z-Axis is trammed perfectly? That could be a big source of my problems as well since this is not a first time issue for me.
Also, yes this is a soft wood. The customer supplied the wood to me. Said he picked it up in a large sheet from lowes and cut it to the size he wanted.
that bit is really good for cutting all the way through material. At least that is what I primarily use it for. I do use it occasionally for clearing out pockets for cuts where another piece will set in so it is not visible.
For instance I am rebuilding a small gate for my parents gazebo out of redwood. They want it a very particular way so to make the corners stronger I carved out pockets where I can screw in angle brackets to reinforce the gate. I also used it to clear out the pockets so that the Bauster will set into the frame tightly.
There are several methods to tram the Z-Axis. If your waste-board is completely flat then you can tram the X-Carve with a simple speed-square. Or, you can hook a dial indicator with an offset bar into the router and check it that way. There is a special setup that has two dial indicators on it, but I’m not sure I would purchase for a hobby-grade machine. Just Google “Tramming CNC” and you will find quite a few Youtube videos. Also, check out Winson Moy’s Youtube Channel; he does not use an X-Carve, but he has some pretty good content.
{:0)
Brandon Parker
1 Like
Like Joe said the bit is great for cutting all the way through things. It works great if you’re using oramask because it cuts it clean.

2 Likes
Just an update guys, I’ve attempted to tram every axis on this machine perfectly. Spent hours ensuring X and Y were perfect, and attempted to get the Z axis as straight as I could without buying a dial gauge. But I’m still getting these lines. The carve started from right to left and for the first several passes it was relatively smooth. But the further it went the more uneven it got.
Also if you look at it a certain way as you can see in the picture, there is a distinct line from one corner across to the other corner.


Did you switch the bits that you were using?
Also, did you check your z axis to make sure that it is flat to the board. I had an issue once where the router was actually sitting at a slight angle towards the gantry. This would create lines lie that as the bit would not actually be flush to the wood but rather at that slight angle.