We use cookies to personalize content, interact with our analytics companies, advertising networks and cooperatives, and demographic companies, provide social media features, and to analyze our traffic. Our social media, advertising and analytics partners may combine it with other information that you’ve provided to them or that they’ve collected from your use of their services. Learn more.
I plan to use a very small endmill around 0.8 - 1.0 mm. I’ve been looking for the right one with little success. Based on what I’ve read I need to set the spindle at low RPM, but with a relatively high feedrate. I’ve tried lots of combinations and still get poor results with lots of HDPE “fuzzies”. I finally concluded that the lowest setting on the Dewalt 611 was too fast so I decided to reinstall my original 300W 24VDC spindle. Since I didn’t want to have to remove the Dewalt spindle mount, I printed out a quick and dirty insert (made from PETG) so the 300W spindle would fit. If you’re interested you can download and print the insert at:
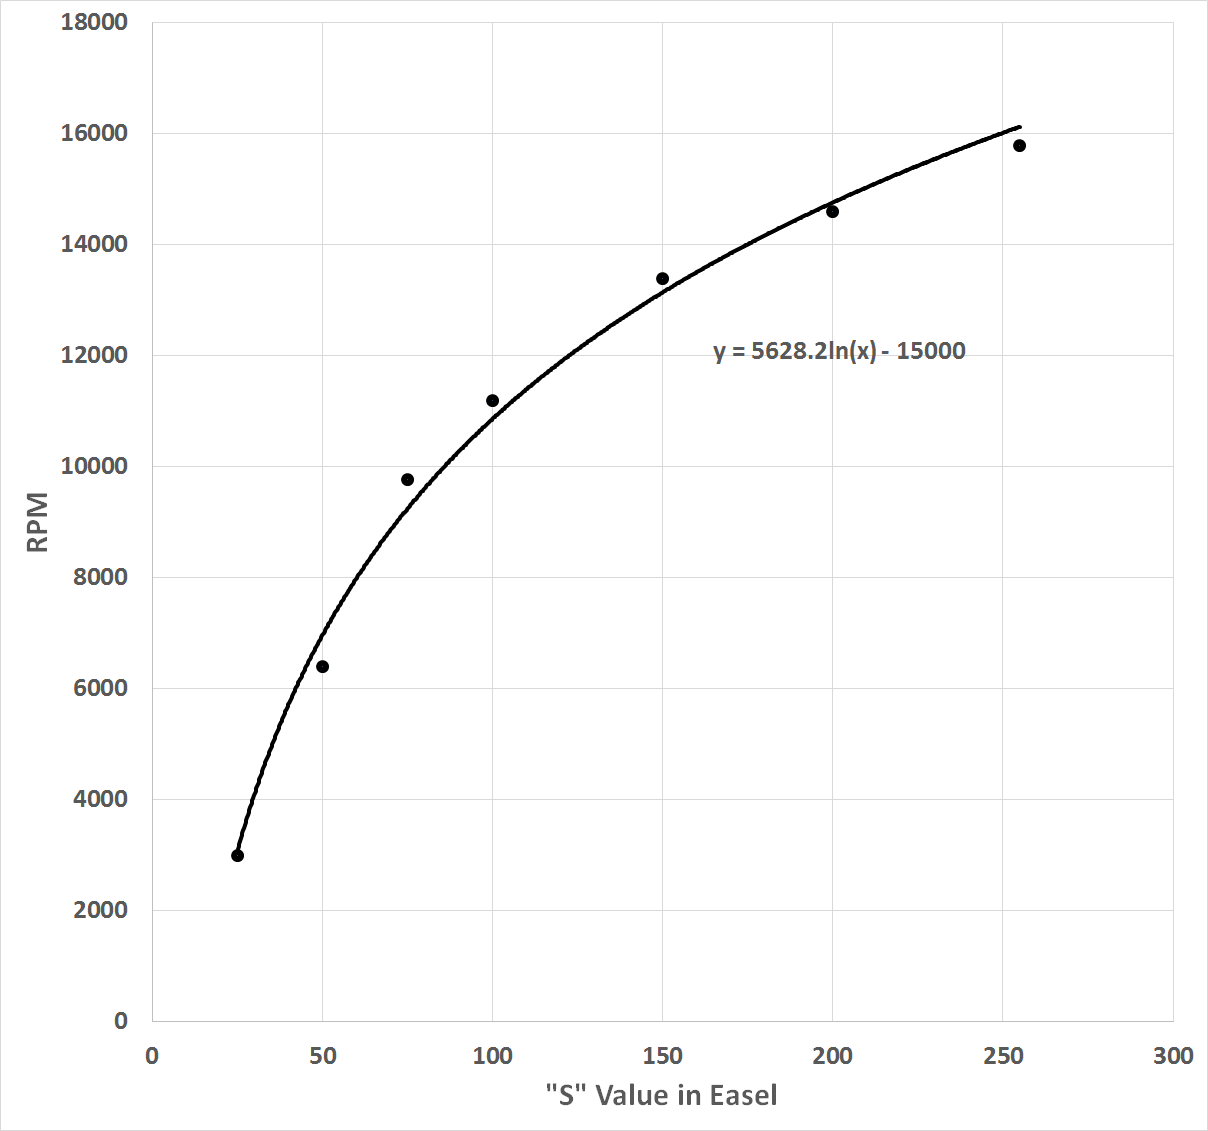
I’ve upgraded my X-Carve with the JTech laser and their GRBL firmware. That meant that the “S” value settings are in the range of 0-255 instead of actual RPM. With the help of a laser RPM meter I was able to correlate “S” values (e.g. M03 S100) to actual RPM of the spindle. The resulting graph along with regression equation is below:
The graph can be used to pick an “S” value for any RPM desired. For those into math, the regression equation can be used to get an exact setting.
All this preparation has me ready to go. The last (and probably most important) step is to get the right endmill so I can get clean cuts (e.g. no melting, no fuzzies, etc.) from my 2-color HDPE. I’m going to start with a down-cut, single-flute endmill. I welcome comments, suggestions and/or corrections on any of this. I will report my results. Thanks!
I suppose I could engrave this in two steps, but I’d prefer not to. I’m only going 0.6" deep. I’ve ordered a down-cut endmill so maybe that will do the trick??? I was going to cut either 0.2" or 0.3" per pass. Do you have any suggestions for RPM, feedrate and depth of cut values? Thanks!
Also the rough cut doesn’t matter on depth it just cleans up the perimiters with the clean up cut. Also if u are going to be cutting the border out of the material entirely use a separate file so it wont do it with the finer bit. Also (again) go fast as u can with slowest speed and less passes is better.
Can u share the easle file so i can take a look at the feeds n speeds.
With ur current settings a rough with 1/8 and clean up with 1/32 is 10 min + 20 min. Straight with 1/32 is an hourish.
But u can def play with speeds feeds and step over. Are u only making one or production? And why. Depending on ur answer we can proceed in a few ways.
Then the world is ur oyster baby. Take it safe n slow no need to do a rough cut. If it were a production i would help u nail the time to the wall. For just one item take it easy and practice on the spares and leftovers.
Right, that’s what I’ve been doing and still can’t get a clean cut. I’ve tried several different single-flute endmills and all kinds of RPMs and feedrates. The down-cut endmill arrives tomorrow. From what I’ve read that seems to be the best solution for HDPE. I wish there was some guidance given from Inventables on engraving the 2-color HDPE they sell.
I’d like to use a high feedrate, but I also don’t want to snap off the 0.8mm endmill. I have enough extra material to practice and can start low and work up until I get a clean cut. I hope the down-cut endmill is the solution.
What about using a v-bit to clean up the edges? Like make your design slightly smaller and then use a on path v-bit to clean up the edge as a single pass.
Just a thought. I have not tried to cut this sort of plastic yet. I have some but I need to slice it up. Maybe this weekend or next. Waiting for my new belt to arrive.
Single flute endmills are your best friend with HDPE. I did a carve the other day with a 2flute and it had toooons of fuzzies, did the same carve with a single flute and it had perfect, clean edges.
The intricate design means I have to use a very small bit (1/32") to maintain the detail in the design. I’ve had some success with the down-cut endmills, but I’ve also snapped some off if I don’t get the right combination of feedrate and RPM. I like the idea of trying a V-bit to clean up the edges, but I suspect that its use will bring on new challenges. I’m wondering whether another material might be better for this project. Somewhere I saw the idea of painting some acrylic and then engraving through the painted surface to the acrylic below. Unfortunately, I don’t remember where I saw it (either on the web or on this forum???). That technique would allow me to work with something other than HDPE and it would allow for more color combinations since I could paint white acrylic any color I wanted before engraving.
After a couple restarts (one brought on by an automatic Windows 10 update), I was able to complete the engraving. Here’s what it looks like right after completion:
As a summary and, maybe, some help to others who might want to engrave something as intricate as this, here are the steps I took to make this all happen.
Be sure to have the surface as parallel to the plane of the X-Carve as possible. My wasteboard is not parallel enough so I had to carve another surface to sit on top that was parallel.
I did this with a 1/2" endmill that carved a large square in 1/2" MDF that was big enough for the 12" x 12" HDPE. You can see the piece of MDF under the HDPE in the first photo.
I used EasyTack to be sure the HDPE and MDF surface were in close contact. I then clamped everything into place.
Even with the parallel MDF surface there still was about 0.5mm (~0.02") difference between the highest and lowest spot on the HDPE. Since I was only engraving 0.06" deep this still was something to deal with. Using a digital depth gauge I found the highest spot on the HDPE and set that to zero.
I set X and Y to zero and started the engraving process.
I generated the Gcode file in Easel and sent it to the X-Carve using PicSender. Universal Gcode Sender choked on the >10MB file causing a restart.
The following values were set in Easel: 50 IPM, 0.01" per pass, 6400 RPM (using 300 W DC spindle) and 25% Stepover.
It took more than 10 hours to get all the engraving done. I’m glad this is a one-and-done project. I don’t think I’ll be working with two-color HDPE anymore. I’ll post a picture of the final clock hanging on the bathroom wall.
Gotta remember I used a 0.8mm endmill with 25% stepover and only 0.01" at a time so there wasn’t much material coming off. Maybe that wasn’t very efficient, but it was the only way I saw to get the quality I wanted. The design required that I use an endmill that was 1.1mm or less (according to Easel). I tried other 1-mm endmills, but they didn’t work as well as the 0.8mm one. The exact time is a little hard for me to pinpoint since I had the two restarts, but it took at least 10 hours.