
1st post
so my daughter who is 10 is a big fan of Percy Jackson…

when she understood what the XC is and what it is for,
she asked me if I could build for her what she calls an ‘Aegis’;
not the gun on big ships that looks like r2d2, although that would be fun too,
but rather a shield which has on it the head of a gorgon:
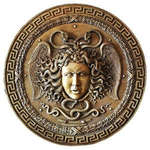
I tooled around a bit on the internets and came across this utterly fantastic door knocker from Paris that someone had managed to scan and build a mesh from:
http://static.spark.autodesk.com/2014/10/13__15_12_58/data4b160904-5403-11e4-8e14-22000b250b09Large.jpg
It is at http://www.123dapp.com/catch/Medusas-door/2918671
She said it was ‘too gross’, which I heard as “perfect!”; we’re trying it.
The files are in fusion here: http://static.spark.autodesk.com/2014/10/13__15_12_58/data4b160904-5403-11e4-8e14-22000b250b09Large.jpg
Of couse I am cutting this into firewood again, so do not be confused if you look at the model and that is all you see: the medusa head is inside it, waiting to be cut out ![]()
I have started a Flickr set embedded here so you can see what is happening:

This AM I am complete my first clearing pass and hope this weekend to complete a second clearing pass and a finishing pass. Some notes on this:
I cut all of these meshes using Fusion 360 as a design and CAM tool.
The workflow is:
- Get a mesh somewhere
- put mesh into meshmixer
- edit mesh so it has minimal footprint and therefore fewest facets / triangles while retaining the important bits
- save the mesh as _meshmixer so I know which it is
- import the _meshmixer version into memento
- auto-repair the mesh so later it will convert correctly in fusion
- save the file as _meshmixer _memento so I know which one it is
- EXPORT as quads with a face count <8000, needed so later you can convert the mesh in Fusion
- open the project in Fusion
- turn off the timeline so you can import meshes
- import the mesh
- convert the mesh into a surface
- convert the surface into a solid
- orient/scale/ etc as needed.
Both the memento conversion to quads and the fusion conversion chain are failure prone;
they do not always work due to ‘mesh issues’ and when they fail it is almost impossible to figure out why.
Also, I cut all of this stuff out of firewood, so the workflow there is to scan the firewood and generate from the scan the model of the stock, which is used as a body in fusion and then designated as the stock body in the CAM tool. When it works, it works really well… but getting the scan is not a very good process so far.
For this project I tried two different tacks to get a mesh of the firewood body:
- taking photos and uploading them into memento so it could generate a mesh
- using the 123dCapture APP on my iPhone and generating mesh that way.
for memento, the conversion took about 20 minutes and generated a rough mesh which was pretty close, but had obvious errors in it. was not sure it was good enough, but got it imported and generated a CAM Path with it.
I tried the memento route because 123dCatch took literally a week to generate the mesh for it’s version. Once you start it there is no way to stop it (Poor UX to say the least) so I let it run and was surprised when it delivered a much more detailed and accurate model, which I ultimately ended up using.
so the takeaway is that this is not the most responsive path, but when I asked Autodesk they gave me basically these options plus a landscape scenery option (recap, which seems to use the same engine as memento), so I guess absent spending ~$450 on an occipital scanner, these are my options.
My toolpath has 3 passes:
a clearing path using a 1/4" end mill
a clearing path using an 1/8" end mill
a finishing path using a 1/8" ball mill
This approximates what I did with my last carve.
I have competed my first pass:
https://www.flickr.com/photos/soaringhorse/27316569855/in/album-72157668240117810/
Pass #1 was a nominal ~2.5 hour machine activity
it took several tries to get this completed:
- try 1 was set up at 1500mm/min with 3mm DOC on a 1/4" end mill. aggressive. got quite a bit of chatter and observed the wood climbing the mill a bit in places. then the right rear ecentric nut came off, about 60% complete. had to abort.
- try 2-~7: fixed the e-centric nut. Tried to edit the .nc file to find the right place to resume. kept getting air cuts. getting impatient, cutting bigger and bigger chunks out of the file…
- try ~8: ooops. cut too much out of the .nc file. now sending the bit crashing into the piece and trying to cut into stock that previously should have been cut down but wasn’t. so 6mm DOC and really FAST. eventually the mill just simply bounced off of a surface and then took a detour into a part of the piece it should not have… awful.
- break: had to re-tighten more of the ecentric nuts: the entire x-carriage is floating kind of loose from banging around like that
- try ~ 9: decided to back off the DOC for the entire thing to ~2mm, which I am much more comfortable with. 10 yr old says the errant cut might just look like a sword slash and tells me to keep going. since I reset the DOC I need to start over from the beginning and recut the entire thing, or subsequent toolpaths will be wrong. I am not catholic, but decided to treat the entire experience as a sort of penance. Start cutting. after ~ 1 hour of air cutting, start to get bored, notice that the right front bottom x-wheel is not turning when the x moves, but is just sort of hanging there. actually left front bottom seems pretty loose too. still aircutting. decide to just adjust them while it is running. tighten the nut too far, jam the X, causing it to pull the belt loose. no more X movement. stop the cut. spindle still turning. Easel tries to rehome the bit, sends it straight into a clamp. without thinking, do some sort of martial arts move on the gantry and push it back up the Y axis to get the bit out of the clamp. Y-belts now totally pulled loose too. plastic from the clamp everywhere.
- another break: retighten all of the belts. re-tighten all of the nuts. re-adjust all of the pots. Thinking about how it took 10 years for that greek guy in the odyssey to get home. that was a case study in poor decision making. wondering if history is repeating itself.
- try ~10: aircut it again, from the start. repeat to myself over and over: ‘don’t touch the machine while it is running. don’t touch the machine while it is running.don’t touch the machine while it is running.don’t touch the machine while it is running.don’t touch the machine while it is running.don’t touch the machine while it is running.don’t touch the machine while it is running.don’t touch the machine while it is running.don’t touch the machine while it is running.don’t touch the machine while it is running.’
when it finished, I went in to get a drink, and showed Wendy and 10 year old the final cut. they seem impressed I have made it this far. not sure why. When they asked I said it was easy: the machine did all the work.
I am getting ready for pass 2 now. worried that the stock is mounted too low on the Z and may have to raise it. also need to trim the edges as I am doing silhouette cuts and the 1/8" bits are shorter, so pretty sure the 611 will hit the sides if I do not, so I need to either mill the material around the cut area flat, or cut it off with some other tool.
It’s always something, but it sure is fun.

