
Hello!
I am thinking on making a little enclosure for my 3d printers and xcarve… is:
120 cms W x 110 cms L x 60 cms H

Is that good enough? (this is for an appartment, so smaller is better!) I want to keep all the electronics attached to the side.
Hello!
I am thinking on making a little enclosure for my 3d printers and xcarve… is:
120 cms W x 110 cms L x 60 cms H
Is that good enough? (this is for an appartment, so smaller is better!) I want to keep all the electronics attached to the side.
110 cm to 102 cm is the absolute minimum that would cover the foot print I made an enclosure for mine and gave myself about 4" on the sides and an inch or so front to back for clearance so far no issues here. I gave myself about 60 cm top clearance as well allowed for lights. I put in some halogen cabinet lights but will move to LEDs to keep it cooler. I would definitely set up the inside as a sound reducing shop vac area this things makes serious dust.
Nice I also want to put lights inside, but a very thin ones, maybe in the back so they don’t take any clearance. Maybe I should lower the height to 55 or 50 cms, 60 cms looks ‘too’ high now looking your enclosure
I like the idea of a lit enclosure. Assuming you have a decent 12V power supply such as the standard 400W unit, and that you are not running a DC spindle powered from the same supply, you could use stick on LED light strips that are plentiful and inexpensive on Ebay and Amazon. They are about $15 for a 5 meter roll. I’d suggest the waterproof ones as they are enclosed in flexible plastic which seems to be better for a dust filled environment.
–Rick
Scratch this… As Angus reminds me below… the power supply is 24 volts, not 12. I got too excited.
–Rick
I personally have a spare 450watt computer power supply I am going to use for my leds and spindle coolant pump but did not think of running more lines off of the Xcarve power supply. Trying to keep the machine power seperate from the add ons power.
I think he was referring to the early xcarve there was a black and red power line going off the power supply to the spindle no longer used now everyone changed to the routers.
I remember now… the other thing most people routed that to the power on relay to keep the auto spindle on and dust collection.
Your diagram indicated placing 3D printers on the enclosure. I have an X-Carve and two 3D printers but would never place the 3D printers in the same area as the X-Carve. The X-Carve creates dust which should be kept well clear of any 3D printer that needs a dust free environment.
Drat. I got too excited at the concept. You are correct there isn’t 12v on the XCarve. I feel almost as silly as I would have if I had wired up and then blown out the LEDs.
–Rick
I want to put a lid that opens in direction of the 3d printers, with some pneumatic pistons or something I have still need to figure out ![]() (so -I hope- there are never dust transfer while the xcarve is working with the lid closed.
(so -I hope- there are never dust transfer while the xcarve is working with the lid closed.
I want just to put a 220V led strip on top:

It is 110 cms long, fits perfectly and it is very powerful (20W)
I am still thinking on the design… not sure about these drawers 
The left side is for attaching the psu and arduino. Right side will be to store small sheets of materials
Looks good. What are your plans for dust collection. It’ll build up pretty fast.
No plans yet  I was thinking on cleaning it with the vacuum after use, just manually. I don’t pretend to make big jobs.
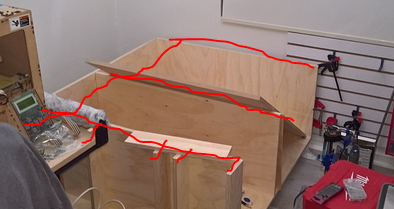
Most of the enclosure is ready  here is the base:
Now the full assembly:
Next, I need to cut these frontal part and figure how to make a door maybe an framed acrylic sheet in angle with pneumatic pistons or something like that
Yes but I think how it is now is strong enough no? I mean look at the middle section there is a center plywood already:
All the plywood is 18 mm.
Here is how it looks now
The only thing missing is to cut and build something for the X-Carve covering door


