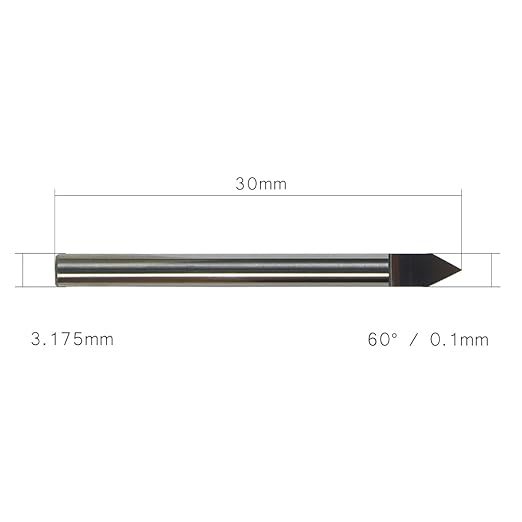
My current project requires fine detail. I have a v bit that I bought from Amazon and want to get it added to Easel, however, I’m not sure what value is needed for the “width” in Easel. Here’s the specs on this bit.
Which brings me to my next question. Rather than relying on this tiny bit to “fill” carve an area on the project, is there a good way to use a larger straight bit? Does anyone have a good process for this?
TIA
The engraving bit in your image has a width of 3.175mm, or .125in. That’s the maximum width it can cut.
I believe below is what he was trying to link.
I also believe the “width” thing as been mentioned before and it should actually be the diameter so the setting would be for a 1/8" 60 degree bit.
Am I right about this?
1 Like
In Easel Pro and V-bit you enter the value of the tool, not the tip.
So if you have a 3.175mm V-bit like shown above you enter 3.176mm (or 1/8")
Or 1/2" (12.7mm) if you have a larger/wider V-bit of that size.
The width of the tool is relevant because that is what determine how deep the tool need to go in order to touch both sides of the line/design.
Thanks all! My confusion came from reading a thread on v-bit carving a few months back about needing to know the dimensions of the flat portion on the bit’s tip.
Your link goes nowhere so can’t help you there.
Fixed my original post for anyone else reading this thread.
You need to do a two stage carve where the detail bit is the Vbit
Is there an easy way to do this?
Some v bits have 3.175mm 45° *0.2. or similar (guess this is like the image has 90° / 0.1mm)
I understand 0.2 is the width of the tip. What is the appropriate way to set this up as a tool.
is 0.2 the stepover? Do I zero the tool when it touches or is there a way to calculate where the tip “should be” if the V met at a tip? (so that when the tool touches it is at -0.23mm) I’d be thankful for a formula there.
You take half the tip width and divide by the tan of half the angle.
After zeroing the bit, just back it up by this amount and Re zero here.
Hey Chip,
Yes there is an easy way! You just need to do a tool change. Easel does calculations for you on what the ‘roughing pass’ can reach, and what the ‘detail pass’ takes care of.
In the upper right corner of the screen next to the bit selection, hit the + sign. It will prompt you from there as to which bits you have in mind.
Back when Chip originally posted into this thread (Jan of 2018) 2 stage carving had not yet been released… April of 2018 is when Easel integrated the multiple bit feature … 
I don’t always answer questions…
but when I do, they are 5 year old questions.
Yeah I realized after posting and was pretty embarrassed.
1 Like

