Let me start by saying i’m pretty bad at finding what i want on here as far as existing topics go. (searching can be a project in itself)
Having said that, i have an idea for a jig that i’d like to get opinions on. I want to carve a “made by” type V-Carve on the back on a bunch of pieces that are all the same. My idea is to get the pattern for the standard hold downs, drill straight though and have a decent holding surface (about an inch or so, then have the maching make a perfect 90 cut through.
the general idea is to leave that bolted down through the top, then use toggle clamps on the outside 2 faces and keep “home” the same so i can batch out a few dozen carvings in the same spot at at time.
your thoughts?
Excellent idea. Consistency is key. Also time saving. Love to see your design
i’ll see if i can throw a mock up for it in the morning. it was just a thought for now.
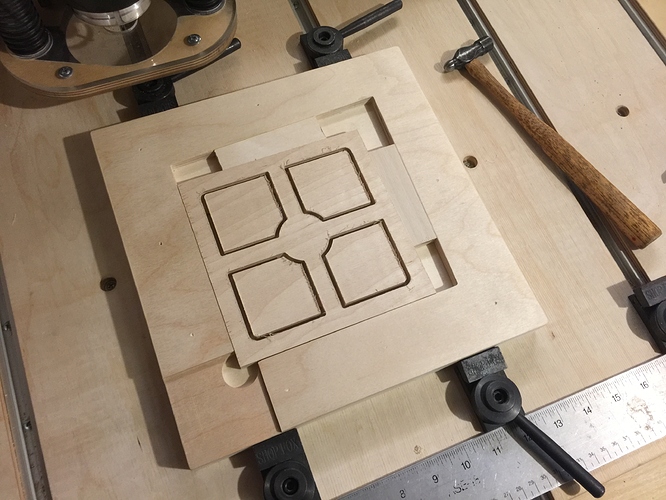
something like this.
I made the through holes based on the wasteboard drawing. countersunk the top for a metal washer for better clamping. and put a 1/8" hole on the inside corner so that the work piece will be all the way to the corner and not have to worry about a random radius from a bit. it’s only 6" x 6"
it’s pretty simple and will allow for quick change of work pieces after a simple carve and will allow all pieces (if cut the same) to be centered every time.
Might make a 45 degree one, too.
so, what do you guys think?
There have been many topics done on this. It’s a fantastic idea. However you should leave a little more relief in that corner.
And look into machine coordinates.
i can change the corner to 1/4", should allow for enough room as well as retain a little more sawdust and not worry about build up as often.
what about machine coordinates? my use for this jig would be to have items cornered on this, then have the machine set to center the pieces. the center of the piece would be X=0 Y=0. then all i’d have to do is loosen the toggle clamps, raise the bit and put in the new piece. re-clamp, lower bit, carve, light cigar, rinse and repeat.
How big are your pieces? And how many can you fit at once on your wasteboard?
my pieces are about 8" x 6". once the jig is bolted down, i would use toggle or those offset clamps to force it in the corner. that would allow for quick change of simple carvings. i’d mainly be using this to brand the backs of my work. i wouldn’t use it for long carvings.
At home I use a carpenter’s square that I drilled three holes into that match the factory waste board. I did this to make two sided cuts with the laser on thicker materials, but have also used it when the wife wanted some card stock cut for table decorations. this ensured that all the cuts were exactly the same over and over, I just placed the card in the pocket of the square (this was also where I had zero the machine) and run the code. made about twenty cards all identical much quicker then resetting zero over and over for each card.
That’s the idea, but i’d be using the center of the piece. just my preference. i can easily zero it out in the corner.
If you have a bunch to do and you wanna bang em out real quick then you can use coordinates to your advantage. Set up a few of these “stations” and you can do a few at once.
Or make up two, then you can set up one to cut g50 then set up the second as it cuts the first then g51 and keep it moving.
I was considering having a few. need to work on my coordinate placement. i’ve mainly been working off of one design at a time based on center or corner placement.
Home the machine.
Then cut the clamps as u set the coordinates. Take your time setting it up and u will be glad you did.
I’ve simply used 1/4" pins to create a consistent location for my pallet/jigs. They fit snugly in the clamping holes:
You can only see 1 in the picture, but that pallet is 14"x14" and I’m using 4 pins in total, 2 on each axis spaced about 8inches apart.
1 Like
this I like and never thought of. thanks for sharing.
now I got to go get some pins that fit in the holes.
Pins are only as useful as they are squared to your machine. Double check!
I made a few of these jigs for some parts I make allot of. Material holds with two wedges that push and secure the material into the corner. I am able to quickly change out my finished part, put in another piece of stock, and move the machine back to the starting position. This jig has saved so much time.

4 Likes
Very nice. Im guessing you use g codes to move the machine back to access your parts?
I use easel for everything I do. I just jog the machine out of the way in 1" increments, change, and move it back. I do have to zero the bit to the material.
I made the jig. very simple, even added it to the projects folder for others to modify as they see fit.


