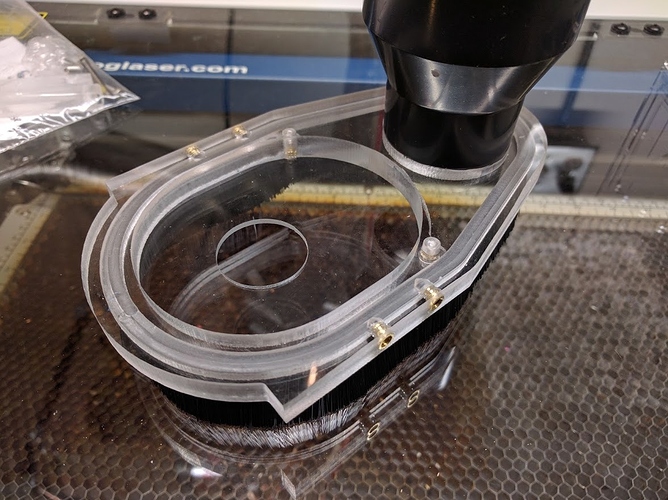
SuckIt V2 - First Impressions!

So, a few weeks back, Jennifer Chepurny dropped me a line and asked me if I’d be interested in playing around with the proposed new version of the SuckIt dust boot. Well that didn’t take much time to decide on, a chance to try out new gear! Electrons had barely settled on the email before I said I was all over that.

Before I even start here, for transparency, I received this upgrade for free, in return for my input on the design and utility of the new variation. I have tried to be as objective and fair as possible.

A couple weeks later, oh look, a box in the mail! The boot came in its component parts, with the threaded inserts already installed, and it took me perhaps ten minutes to get it all assembled, about three minutes of which was taken up finding my allen keys to install the magnet-holding slides. The slides are not shown in these two pictures, I added them right after I took these. The only problem I ran into during assembly was that the magnet-holding pockets in one of the slides were not deep enough to actually hold the magnet in place. I resolved that by just removing one of the (identical) magnetic slides from my existing one, and moving it over.

Before I popped it on the router, using the exact same brackets as my first version, I weighed the two of them. The original version weighs 6.4ozs according to my postal scale, the new one 5.3, for a savings of 1.1ozs, or fully 18% of the V1’s weight.

The most obvious feature of the new one, aside from the weight-reducing, tapered design is the cutout for the router. By cutting through the thick portion of the shoe and adding a thin shield at the bottom, they have created a version that addresses my only real problem with the V1 variant: How much depth capability it took off of the router. With this version, the collet can touch the workpiece before the router body touches anything on the shoe, giving that entire range of motion back.

For scale, here are the two versions of SuckIt, and my previous KentCNC router-mounted boot.

I won’t talk ANY smack about KentCNC at all, they’re awesome guys and they bent over backward to make that boot as good as they possibly could for me. They changed out bristles on it once for softer ones, sent me a new lower shoe, and spent quite a lot of time talking with me trying to get it just right. The weight and stiffness of the bristles, though, was always a problem and resulted in uneven surface finishes on the bottom of pockets, no matter how carefully I set it up or what they did to help. I think it’s rather unavoidable, given how flexible the X-Carve’s X-gantry is. It also weighs considerably more than the SuckIt, although a direct comparison would be rather pointless since the weight is held so differently by the structure. Suffice it to say, I think that SuckIt in either version is a superior dust shoe to the Kent design, which is a shrunk version of one intended for a much larger, stiffer CNC.

With the assembly complete, it was onto the X-Carve with it!

You can see how the cutout lets you get lower with the router, this is about down to where it would have been in contact directly before, and you can see here that I could easily go down another quarter-inch or so, which would easily touch the collet to the workpiece.

The new shape is very apparent, and feels a lot smaller than it physically is. Dust collection is every bit as good or even a bit better than the V1, I think. I was worried that the smaller intake might make my dust collector less effective, but it doesn’t seem to have had a negative effect at all. The waste board in this picture was cleaned off casually just before I started the carve that is shown complete there, and the workpiece and work-space have not been touched since the system turned off. This picture was taken about fifteen seconds after the bit stopped turning. Ignore the dust in front of the stops down on the table, that is about fifteen parts worth and wasn’t cleaned up at all before the test. The collection was quite good!

Overall, I am extremely pleased with this variant of the SuckIt. It’s definitely an evolution of the previous design, no really earth-shaking innovations, but the improved “cut away” design deals with what was for me the only major downside to the V1. The weight reduction is nice, but not critical by comparison, and to my eye the aesthetics have improved with this version as well. Aside from that ONE piece not being quite deep enough to hold the magnets, this “prototype” version is what I would consider a good-to-go product.

Thank you Jennifer for giving me the chance to test this one out! I’ll be keeping this thread updated as I work with it more, and post my thoughts and oppinions as I gain more spindle time with it. So far, I am extremely pleased!

6 Likes

Looks like a great addition to the X-Carve. I just ordered a new X-Carve this evening and have noticed a few variations on the dust boot. I’ll have to keep this one in mind.
Thanks for the info.

There are quite a lot of excellent dust boot designs around here by members! If you want to make your own, it’s not excessively difficult or time-consuming, and there are any number of concepts in threads here that work great. I think this is just one of the better “ready made” ones I’ve seen. I had considered making my own several times, but my shop time tends to be very filled with business work. I generally value my time at $30/hr for CNC-type work or hand-operated woodwork at a reasonable skill level. Therefore, if I thought it would take me more than about three hours to make, test, and validate something as good as the SuckIt, I would suggest purchasing it. If you have more free time or prefer to make your own, go for it! Both are entirely valid routes to not having chips all over your shop. :slight_smile:

Wish to see images. Imgur is not working for me and I’m sure I’m not the only one.

Well that’s obnoxious as can be. Give me a minute, and I’ll do some editing. :slight_smile:

There we go, should all be good now. Went to images hosted on the forum instead.

:joy:

I was also a kickstarter backer of v1 and it is awesome! Would love to try the v2, maybe one day when I have a little extra pocket change :slight_smile:

It definitely has some serious advantages. I think the extra bit extension alone is worth it. You could theoretically modify your V1 without that much trouble to be like the V2 in that respect, you DO have this handy little CNC…

I’m so curious about how these things work, looks so cool! So many questions:

How good is the dust collection from these things overall? Does it mean you do not have to do any cleanup? Does it help at all with chips / dust compacting in deep slots?

How much configuration do you have to do on each carve? I see the shoe is fixed to the gantry instead of going up and down with the spindle, does that mean you have to adjust the height depending on the material?

Has anyone made one that pipes in air and also sucks it out? It seems like if you had like compressed air blowing down at the bit you could whip up the stuff to get caught better by the vacuum.

The collection so far, I’ve found, is extremely good. I generally have zero dust remaining on my workpiece once I am done with the project, on the surface, in the slots, or anywhere else. The only dust that will be left around is occasionally a tiny bit will escape around the side when the shoe crosses another pocket that breaks a lot of the brush’s seal, or goes off the side of the workpiece. I really can’t blame it for that, having a whole side abruptly opened to screw with the airflow would mess up any collection system. My old Kent shoe did it too.

You do have to adjust it before each carve, but that’s just a matter of sliding it up and down until it just barely brushes the surface, and tightening the thumb screws. Takes about fifteen seconds, tops. The way this one works seems to be about ideal, the air rushes in directly around the collet for the most part, then crosses the shoe and sucks out on the other side. My original KentCNC design let the router down-wash blow into the area, and I found that it tended to scatter dust around any time the shoe wasn’t firmly in contact with the surface. I think I prefer this concept better.

EDIT: Added some photos. These are mostly with the V1 shoe, but the V2 performs even a little better, as far as I can tell. In the one cherry one, you can see that the downspiral bit is still packing a little bit in. That was pass #2 of 4, and the next pass swept all those chips out and no more built up. It’s rare that I see any like that. These were also all taken during operations, and none of them have had any cleanup done during said operation. It might or might not have been cleaned up before, but all of the machining you see has been done without any cleanup at all. You can judge how much escapes from there!

1 Like

Are those boards (particle board?) holding jigs or added to ensure the seal for dust collection?

A bit of both, actually. Their primary purpose is to be a square corner that the clamps can drive a workpiece into solidly, but they do serve a useful secondary purpose of making sure the gap around the shoe stays more or less even. I also use mine with a very slight lift, about an eighth inch seems appropriate for a number. I use a dust collector, so the static pressure is low, but air movement is very high. So having a bit more gap plays to the strengths of my tools.

Has anyone determined whether or not the airflow across the work provided by a Suckit is a sufficient coolant when milling Aluminum?

I made two of these:
https://www.instagram.com/p/BJoi8zKhDxu/?taken-by=jeremy.s.johnstone&hl=en
One with WD-40 and no vacuum (big mistake - aluminum dust everywhere.
The second I made with no lubricant and my SuckIt boot.
The second one came out better!
Not too scientific but I will continue to cut aluminum with just the vacuum.
See JJ's X-Carve Build and Projects - #53 by JeremyJohnstone for details

4 Likes

Nice. Tool, feeds, and speeds?

@TonyNo See See JJ's X-Carve Build and Projects - #53 by JeremyJohnstone for details

Man, that’s beautiful!

Is v2 up for sale yet? I’m looking at buying one but don’t want to buy an old version if a newer one is coming out soon.

Yes, and if you have an old one you can just buy parts to upgrade.