Finally ready to install the Dewalt router that I bought forever ago.
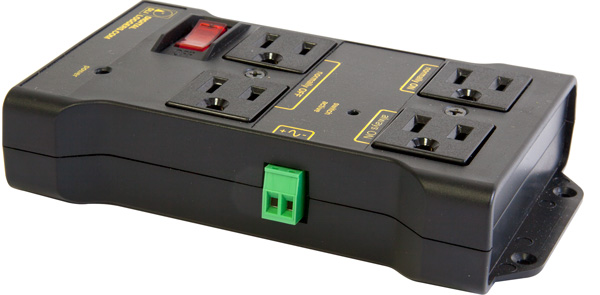
I bought this relay: Amazon.com
I want the auto spindle start to still work. Two questions -
-
How do I wire it up? Is it the yellow and black wires that go in there, or the red and black ones? And which end?
-
Which of the outlets will be controlled by the relay, and which will be live? I figure one outlet gets the router plugged into it, and another one gets the whole power supply/gshield stuff plugged into it. Which is which? I don’t know what Normally On and Normally Off means.
You guys are all incredibly helpful. Thanks in advance!
@AlanDavis Yeah, I’ve seen you post that diagram before, but I think the relay I’m using is different, because the router will plug right into it. See the link in my post above for the one I’m using. I feel like it should be easier than the one in your diagram.
It’s easy, take those Black and Red wires, insert to DC input. Red is Positive, Black negative.
Great, that does,sound easy. And router gets plugged into the Normally Off outlet, or into the Normally On one? And I’m guessing the regular plug for my power supply still needs to be plugged into an extension cord to the wall, right? This relay box doesn’t have any pass through outlets?
Thank you so much for your help!
1 Like
Yes, you have to use extension cable to wall plug, and you can rest relay somewhere close to your electronics. Because your Dewalt Cable will not be long enough after attaching to Drag Chain.
I don’t remember which plug using for relay operation. Plug it to wall, plug your router. If it starts working immediately, then you have to use other set of plug which controlled by the relay. When you plug it, if Dewalt doesn’t come on, flip the toggle switch manual on, it starts turning. That is the best way to test it without sending any job.
Just reminder, keep your speed dial 4 or lower. If you go full speed, it burns your brushes. You never need more than dial 4 on Dewalt, it gives you about 20000 RPM.
Off topic, but the image referenced above is a terribly unhelpful diagram.
Simple, but far from helpful.
The pictures are cute, but for new people they may be a tad deceiving.
It’s all to easy for people to propagate bad/poor information while trying to be helpful/quick.
For it to be helpful, it should show the proper wiring to an outlet.
One should not splice any wires between the outlet and the router.
One splices the power between the AC Mains and the outlet.
The router is then plugged into an outlet.
Possibly this is what the original author of the diagram intended, but when dealing with AC Mains is better to be as clear as possible.
You better ignore that Diagram, go ahead and draw the correct one. We all help each other, learn from each other. And we don’t get paid for this. We can’t help you If you didn’t understand this simple wiring diagram.
1 Like
Hello Steven,
I’m looking at adding the relay to my setup. How did this work out for you?
Thanks
Just get a lot relay off amazon. Basically plug and play. 2 wires off side plug into xcarve box outlets on top plug router into. Not for shop vac, I believe
3 Likes
Hi Chad,
I received the iot relay today and can’t get it to work.
I have the relay +/- wired to the S+/S- on the xc controller. The Dewalt is plugged into the normally off outlet on the relay.
If I switch the spindle control to “on” the dewalt comes on immediately. If I move the switch to “off” or “logic” nothing happens.
In the Easel setup I have the spindle set to “other” at 12500 rpm. Testing the spindle start in the setup does nothing.
Do you see what I’m doing wrong?
Thank you very much.
To use the IOT relay with how you have it setup, the switch needs to be in the logic position to activate the relay with G-code.
Should I also have wiring from the G shield pins to the power supply?
I see in the forum talk of using pin 8 and a ground running to the smaller green plug on the power supply. Since I did not install any limit switches or the 24v spindle, I did not solder in the connector for this. Will I need to go back and do it?
Thanks
After a frustrating day and a self-taught soldering crash course, I finally got the relay working right. That micro electronic soldering is tough on old eyes. ( I had to find the sweet spot on the bifocals  )
)
Many thanks to Phil Johnson and Erik Jenkins for the help. This forum is awesome!
2 Likes
I keep seeing 12500 mentioned…
That leads me to believe that this relay also controls the Dewalt speed somehow.
Is that correct?
Or, am I sadly disillusioned? LOL
Answer is No. Relay turns full power on and off for Dewalt. You have to adjust your speed on Dewalt dial. (Recommended setting is 1 to 3, no higher than 3)
1 Like
Thank You.
I am wondering if there is anyone willing to take photos with an IOT relay, connected to both their X-CONTROLLER and their SPINDLE?
I find that I am apprehensive about all mains sourced electrical wiring (possibly not the only one). “Safety First!”. 
Safety first is good!
With the IOT relay you do not have to make any rewiring on the main side.
That is done for you.
A SSR need work on the main side but this can safely be done by using a separate extension cord where you cut one of the two wires and connect the SSR to this line. (Red line on the image inside Alan’s post) This way you dont mess with the original Dewalt power cord 
Apologies, as I am communicating “outside of my knowledge base”. LOL
I just meant something plugged into the wall. 
What I would like to find is photos of where I should be plugging this IOT thing I ordered to for the spindle, and X-controller.
Unfortunately, the descriptions simply seem like “Martian Language” hieroglyphics I am attempting to read. LOL


