Monster Carve

Monster Carve - also known as UPS guy hates me now.

With my project finally taking shape I think it is time stop derailing Angus’s thread and start my own.

Disclaimer: This is not a guide ! I sailed here into land of unknown and there are quite few things I would do different now.

Let me first give you some background to what I’m trying to achieve here .:

I don’t build things for living and this is just my weekend hobby. I started to look into CNC machines during work on various home remodeling projects. Being IT it was just natural to have computer build things for me.
What fascinated me the most was various flat pack furniture than can be build from plywood and other fascinating materials. Sadly I realized quickly that commercial machines and kits like for example cncparts and shopbot were just simply out of reach for me.
I stumbled upon 1000mm Xcarve kit and decided that this will be great platform to learn on and possibly size it up down there road to achieve my target or 4x8 stock cutting.
Things like ultra precision, speed, sound are fairly secondary for my needs and while I’m still speculating here I believe I can achieve where I’m going with xcarve design. Should this not work out there is still quite few upgrades I could do that are fairly reasonable if I build solid base for the projects. For example pinion system, dual shaft nema motors, wider belts, custom X rail, bigger water cooled router etc etc.

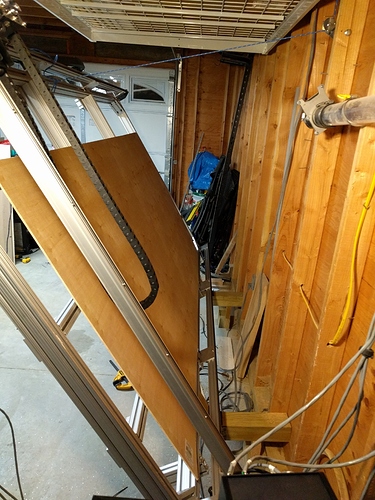
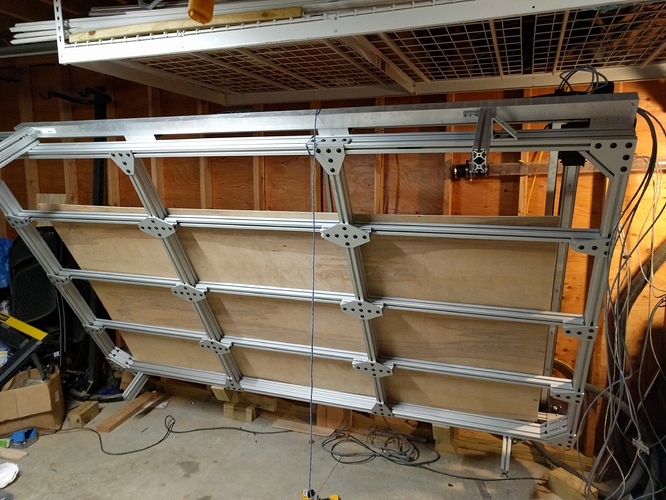
Let me start with some pictures of where I’m at so far


It all started with dear friend of mine offering me for free 6 x 6 feet long 1.5 inch by 3 inch extrusions.
After the trouble if him having to ship it with UPS it was for me point of no return.
Once I received them I was able to figure out that they come from amazing gold mine 80/20inc Their prices are very reasonable and I belie the can ship extrusions up to 108 inches long using standard UPS rates in us.
Next thank god to black Friday inventables coupons I was able to purchase long extrusions. I purchased two 1.8m and 1m rails for Y axis and two 1.8m for X rail.
Next issue I faced was connecting 1.8m and 1m rails to create long 2.8m piece. While base of my build is using 15 series extrusions (1.5inch), x carve extrusions are 20 series (20mm) I knew I can’t use any type of standard plates (I was wrong about it but bit more about that later).
I came across of something designed for Shapeoko, Makerfoot I figured I can use it to support my rails and create solid mending point for my long rails. I ended up cutting both pieces into 4 sections, 3 equal size and one bit longer one to support the joint of makerslides.

With that done next step was experimenting with various ways of connecting 80/20 extrusions. I purchased few pieces and while all of them worked just fine most of them was just way overdoing it and adding just adding to much cost. I finally settled on using 4 corner 45 degree supports you see on pictures and bunch of flat plates you see on the bottom.

For cross bars that will hold most of the weight of waste board(s) I just purchased 10 pieces of their 72 inch 1.5 inch extrusions and trimmed each to 34 inch long. I used all the left overs including one long sections to create about 2.5 inch long spacers to lift the beams to desired 3 inches leveled with tall sections.

That is where I’m at now.
Next step I’m planning to hinge side of the unit to be able to fold it on garage wall. The plan is to use square pipe that my wife promised to weld for me and remote controlled 880lb winch I scored for 109$ from harbor freight.
I’m also waiting for inventables to ship x controller before I start cannibalize my 1000mm unit for parts.

On that note if anyone is interested I will have all the parts necessary for 500mm to 1000mm kit upgrade.

10 Likes

oh man!!! please keep me informed on this project if you can really cut a whole 4x8 with accuracy and no problem i will defiantly look into doing this myself

I would so love that but I have no room for one.

lol right i cant walk in my living room as it is I wish my shop was climate controlled and i would put it there i just dont like the idea of a machine like this constantly cooling down and warming up

Nice build! Love to hear more as the project progresses.

If I could only get my wife to pick up welding… That would be awesome! :smile:

I am interested on the 500mm to 1000mm kit upgrade. How much you want? what city are you in?

Keep us updated on this build looks awesome.

No idea on cost until I’m done should be soon when I start. I’m in NY Staten Island.

Another piece of the build ready(ish).

Winch will be used to fold the frame on the wall you see behind.
Nice score from harborfreight for 100$ I’m sure I will find quite few uses for it.

@Deepnoizer

thats pretty cool I actually have had the same idea using a small atv winch to raise and lower and whole machine dust shield

I would get smaller one for sure, 40lb block of steel is hardly fun to install.

You can’t see much progress here but new shipment of 50 screws arrived and I could finally bolt it all together.
To my shocked this thing is squared up to 1/16 of an inch right after bolting it together. I was expecting to have to adjust things around, I had to do nothing.
I also tapped the maker slides and installed plates, funny how much easier it is once you do it second time. Took me probably 20 minutes for all 4 plates.
I think next step will be some clan up and start to tear down x carve for donor parts.

1 Like

Nice! :+1:

Looking forward to seeing that monster create dust!

This looks awesome, I can’t wait to see it finished. What a monster!

Got the folding mechanism done now. This took tons of work as I had to move up the shelves in garage for enough clearance. Was about to start wiring but I was unable to buy 70 feet of wire in HD, the only thing you could get in NY this weekend was ice melt lol.

Just got nice that my X controller shipped :heart_eyes:
Things about to kick into second gear.

I would love to hear the total cost when this is done and maybe a parts list

Just managed to put full day of work on Monster Carve and things moved forward well.

  • X axis extrusions cut and tapped.
  • installed terminals for motor connections, sadly I did not check the size of the ones I purchased and had to do some steel plate drilling to mount them.
  • X axis drag chain was sagging way to much and it was obvious it will snag on work surface at some point. I decided to put to use tinny extrusions I had sitting around. Turned out well but I can see myself doing it better down the line.
  • During rebuild I decided it was good time to replace washers inside on the Inventables wheels. After fixing all 20 wheels I was still unhappy and bit mad the problem was still tinny bit detectable. Thank god amazon prime, ordered 20 open builds wheels overnight. They came today and wow am I impressed who much bigger and precise they are ! Plastic is thicker and feels like stronger and harder plastic, washers are perfeclty flat on both sides and most of all when bolts are tied full power they don’t bind to plates.

Few pics, I’m planning to do more tomorrow !

2 Likes

Moved few more steps forward.
I changed my mind on X chain support, while black extrusions looked cool it was just bending and vibrating. I just grabbed home depot L shape alu stock, it was not expensive and its perfect for it.


I also installed almost 3 meters of 30mm chain and supported it with much larger L bracket also from HD.

Wiring was so much more fun than my initial X carve build. 30 mm chain links open so you can just lay down the wires without dealing with sneaking it trough. Terminals I installed on all the plates made this also very easy and took me about 5 minutes per motor total. What I did mess up is my calculations of wire needed and sadly 50 feet of wire I got was not enough, had to order another 25 and should arrive by end of the week. For now I just spliced some old wire for testing purpose.
Other end to X controller was also a joy to work on with decent wire stripper it takes seconds not even minutes.
All looks fine except all the axis are reversed. I double checked the wiring and I think instead reversion motors I will just deal with it on software side of things.
I do have to admit I had huge grain fart trying to figure out how to set AMP on x controller board …

I’m still tweaking things with the lift and wall folding but it works very well so far, I just need to cut the steel rope and figure out the distances so the winch stops when fully folded and does not try to rip things apart.
So far it served me very well for all the work under the machine since like I said lifting thing thing by hands is not an option alone anymore.


Sadly I will have to raise the shelves I got over the machines again but I was half expecting it anyways.
Good news is I came up with setup that will not require any welding and is way more gentle with 4x4 wood than it would be will steel square pipe.

Small video from my testing how chains will work. Sorry for quality but youtube camera shaking correction overdone things just a bit.

ps. I know my garage is total mess but weather forced me to work in short bursts of time and building CNC won.

1 Like

I have not but I looked at them a lot. My idea was to have motors drag another bar to support wiring and dust hose without applying additional weight on X.
My understanding is that they are very well made and will work well but no made for precision. More for doors and such.

That thing is like a bed!